0

Make Blue Eyes POP

Hey there, hey there !

It’s nearly Friday waaaahoooo. I can’t wait for this weekend to roll around because im getting to start a Bridal Make-up course this Sunday and i am so so so excited! Ive done other makeup courses in the past but this is a top-up and ‘perfecting’ type course for Make-up artists. I’ll definitely let you all know about it and ill have a review up on new makeup brushes im trying out as well. I’ll let you all know the brand and types very very soon so hold on to your hats!

Anyway this post is based on big sparkly BLUE eyes. I know so many people with blue eyes who never ever use these colours which completely confuses me because hello its the most flattering colour EVER.

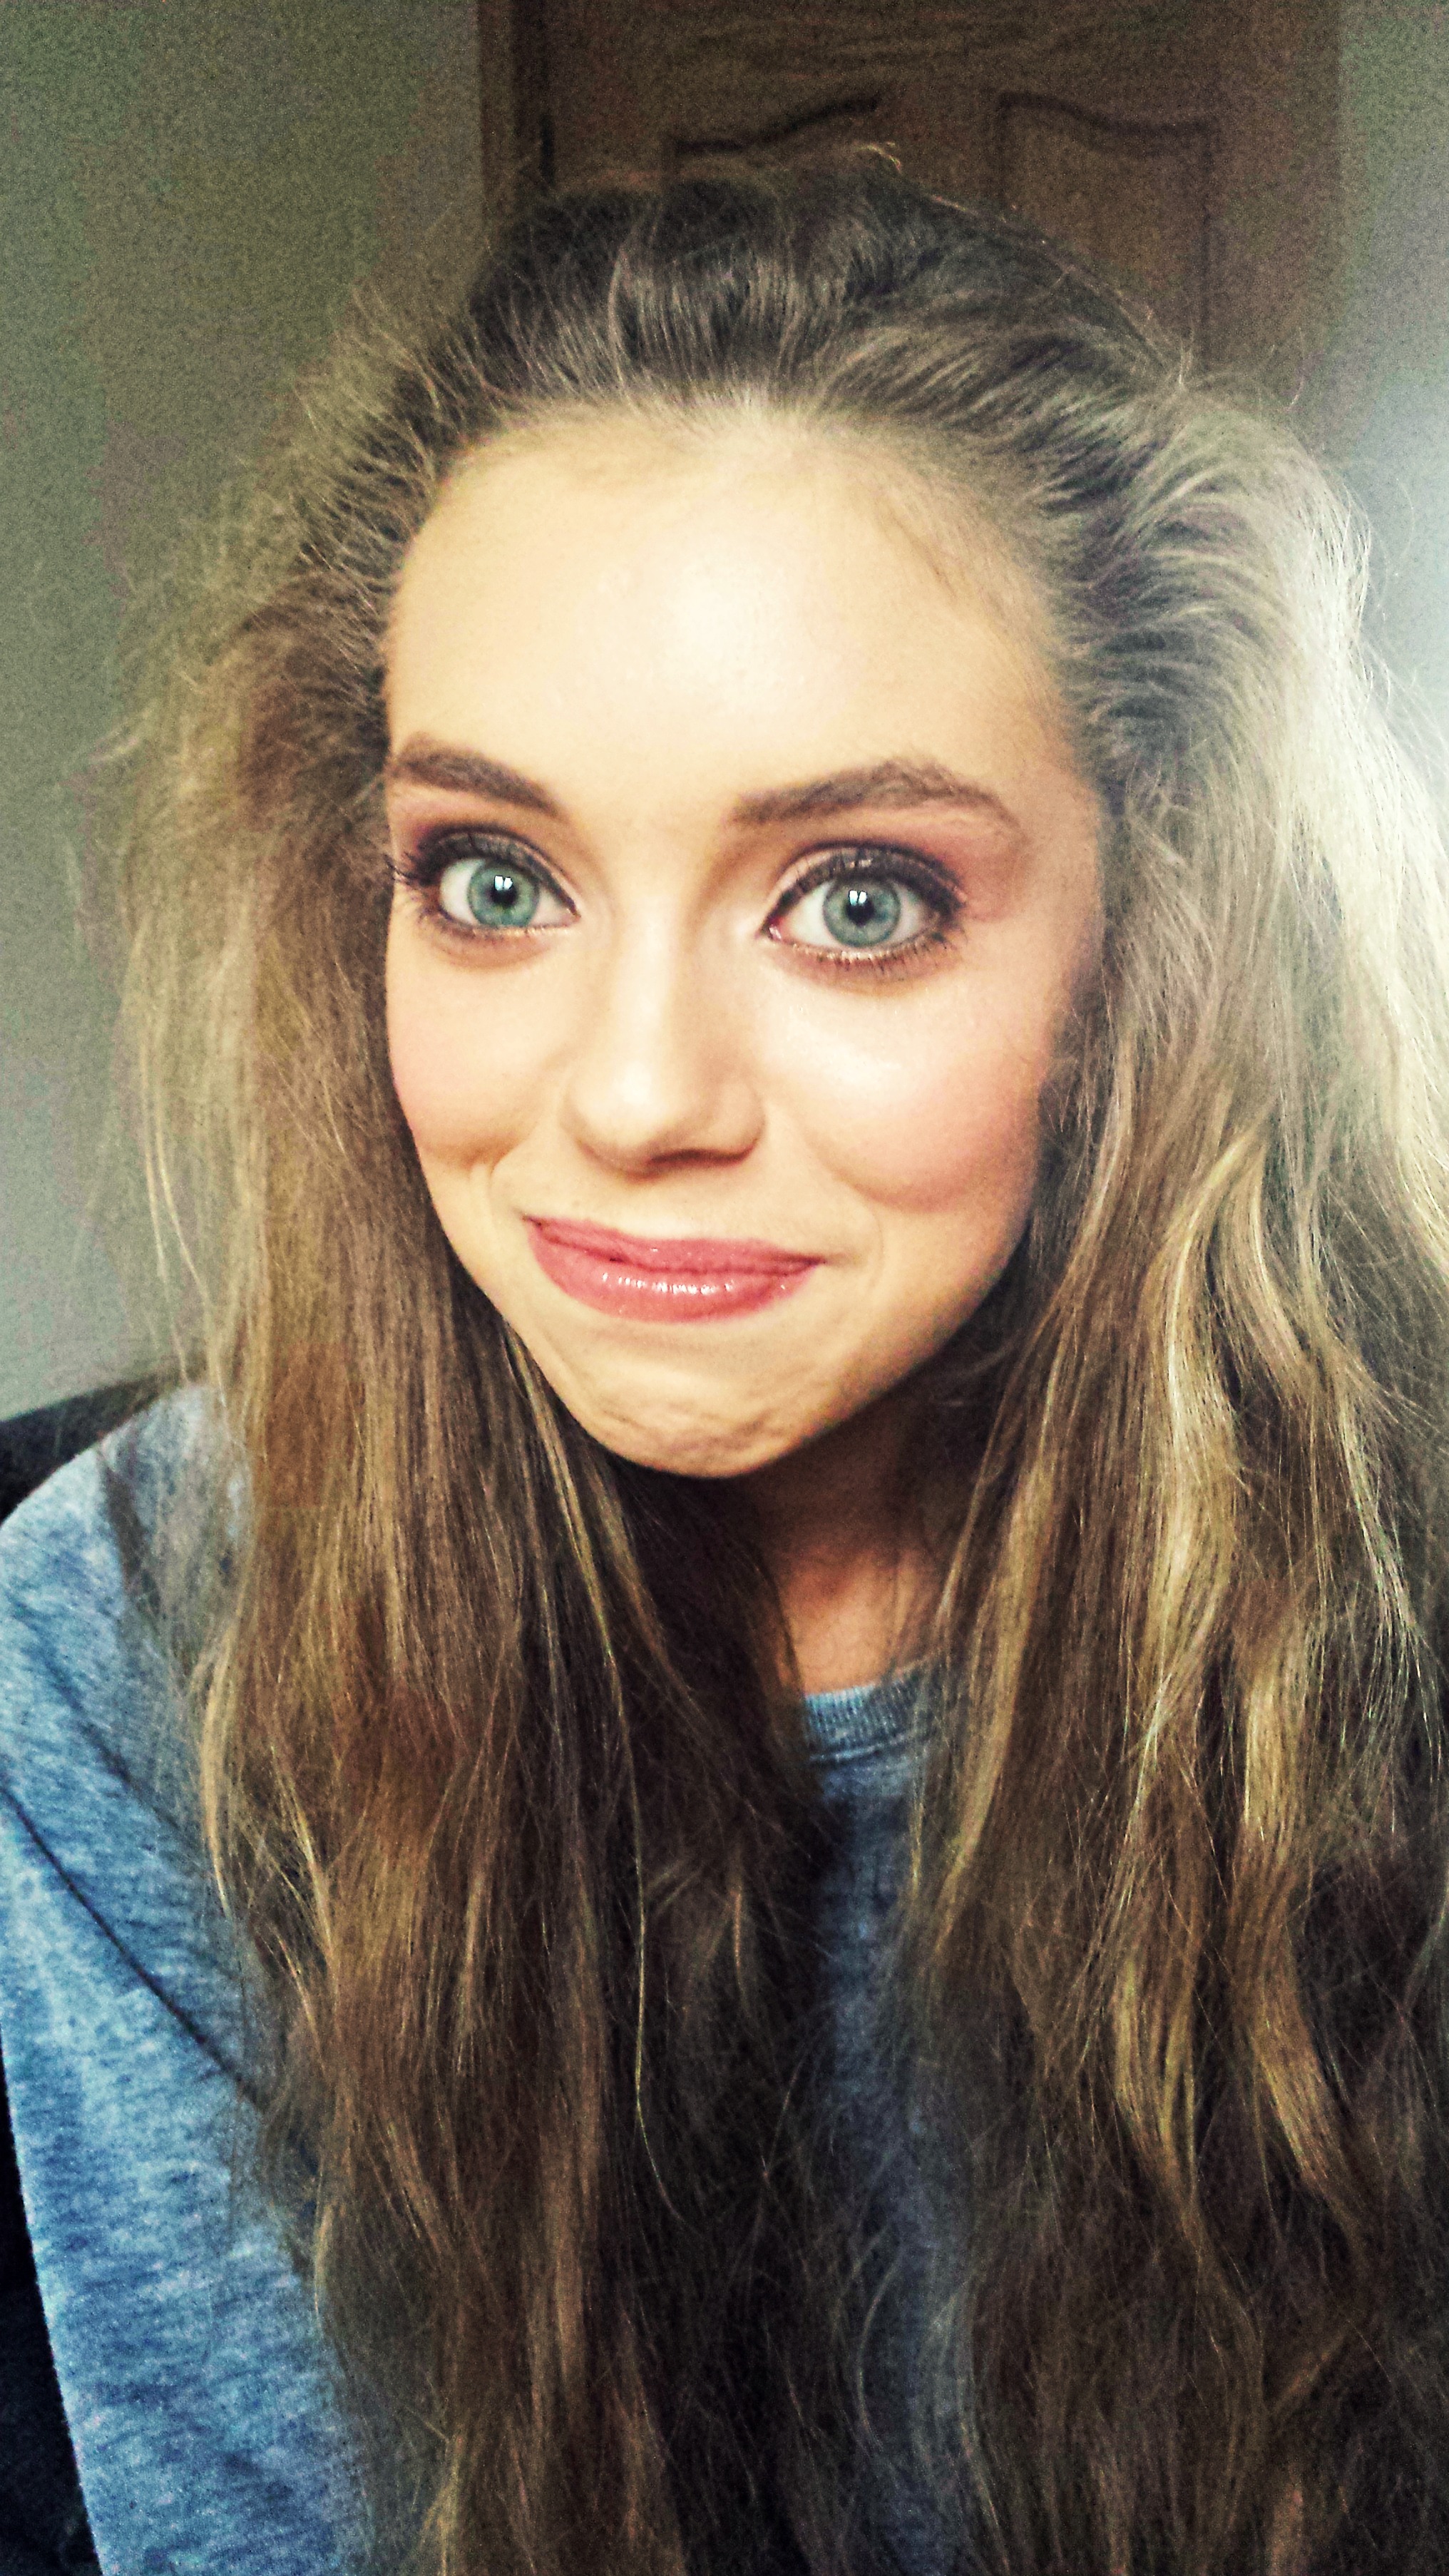
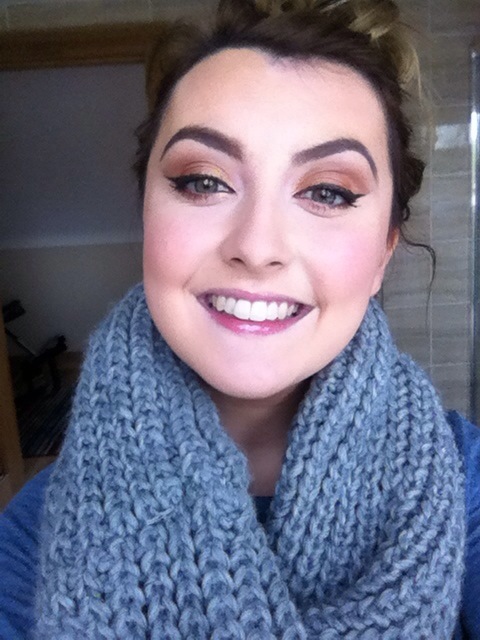
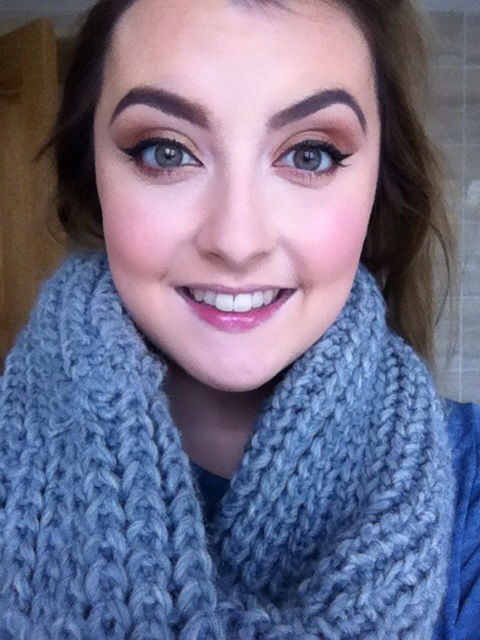
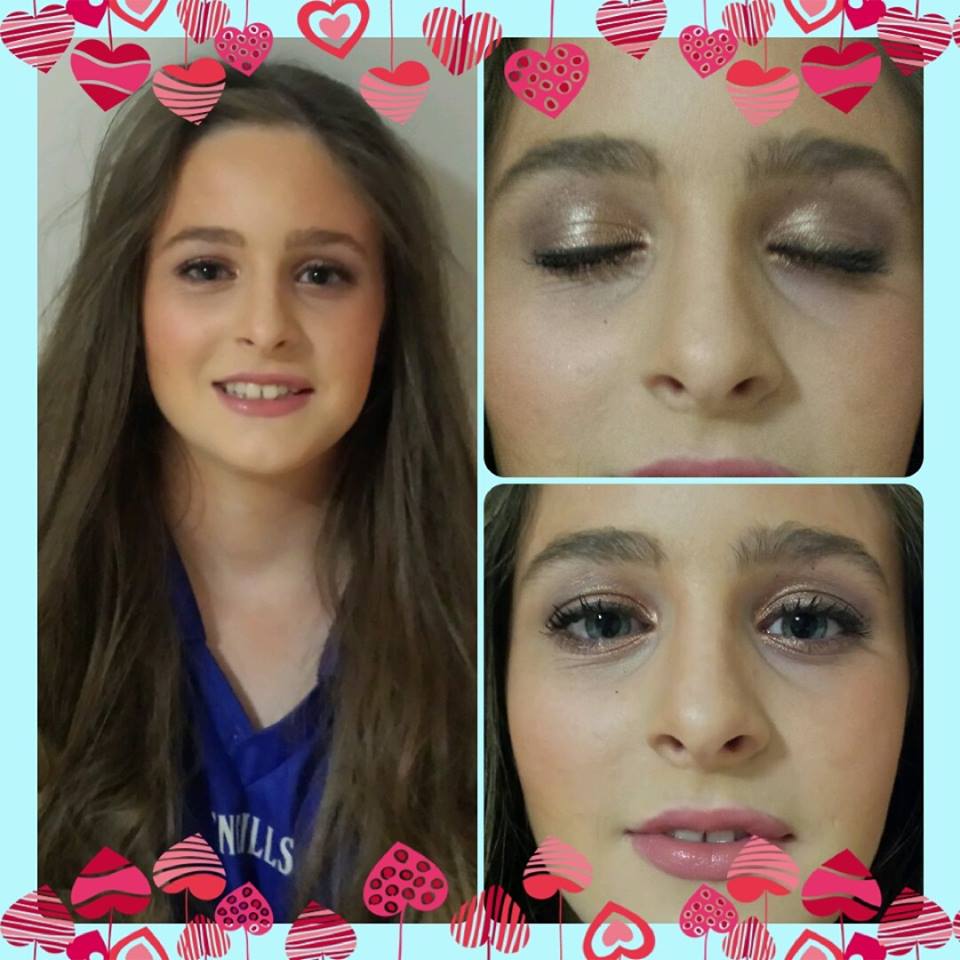
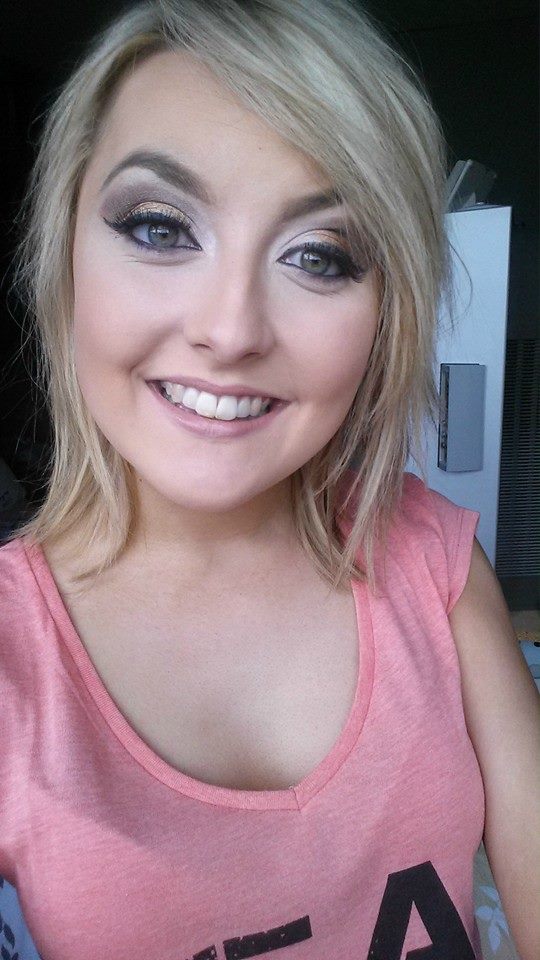
As you can see here below this is my gorgeous model 🙂 

10645071_685336624j889970_1510572092637465212_n

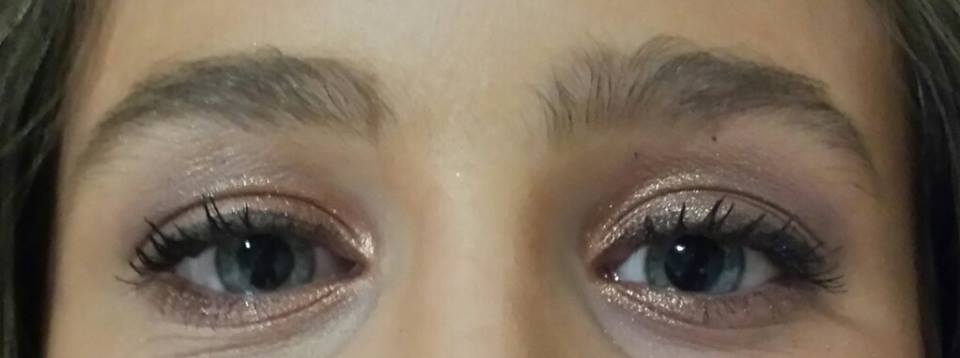
Above I have used Gold tones on her eyes and darkened the outer corners using bronze tones. 

This is the easiest way of making blue eyes pop! It’s so simple and can be achieved using only two shades. 

  1. Firstly I used a tan coloured/ warm bronze matte shade all over the lid, emphasising the outer crease specifically. I blended this shade all over the lid using a fluffy blender brush.If you can’t find an eyeshadow in this shade bronzer is perfect to use also.
  2. Next I applied gold pigmented eyeshadow all over the lid and inner corners with a flat shader brush. I re-applied this shade until I had the depth I wanted, switching between my shader brush and my fluffy blending brush to apply and blend the shade into the warm bronze matte shade.
  3. Finally I applied liquid liner to her lid and a kohl pencil to her water line and tight line. All in the shade ‘black’. 
  4. I completed this look with lashings of mascara.

(For this look I used products that are all found in a drugstore/pharmacy, these shades are so easy to find. 🙂 )

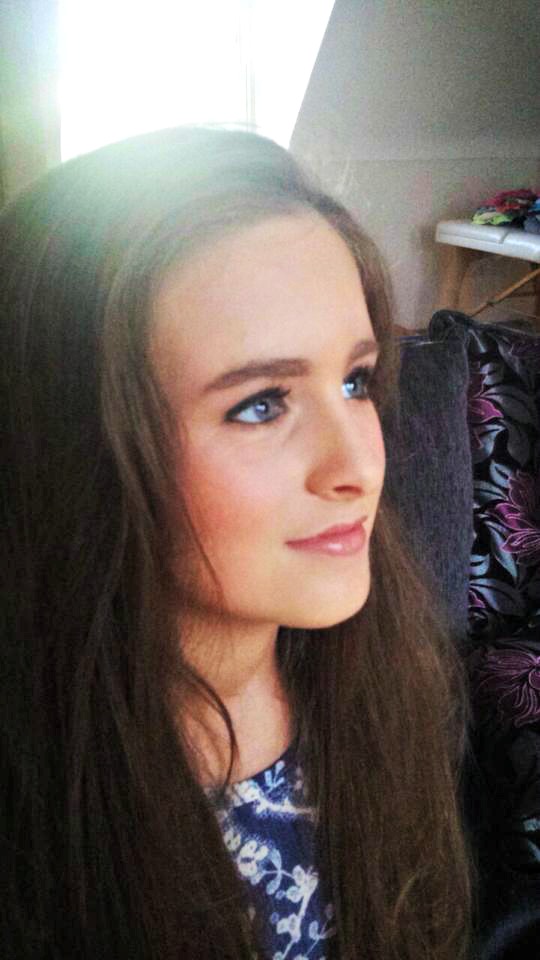
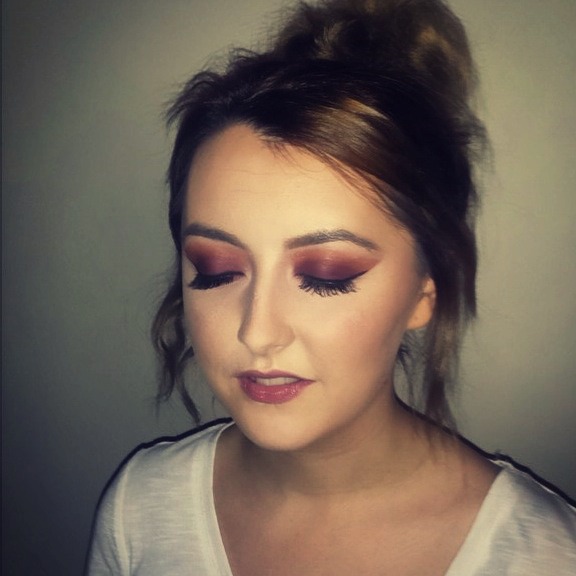
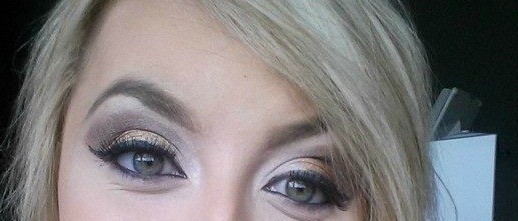
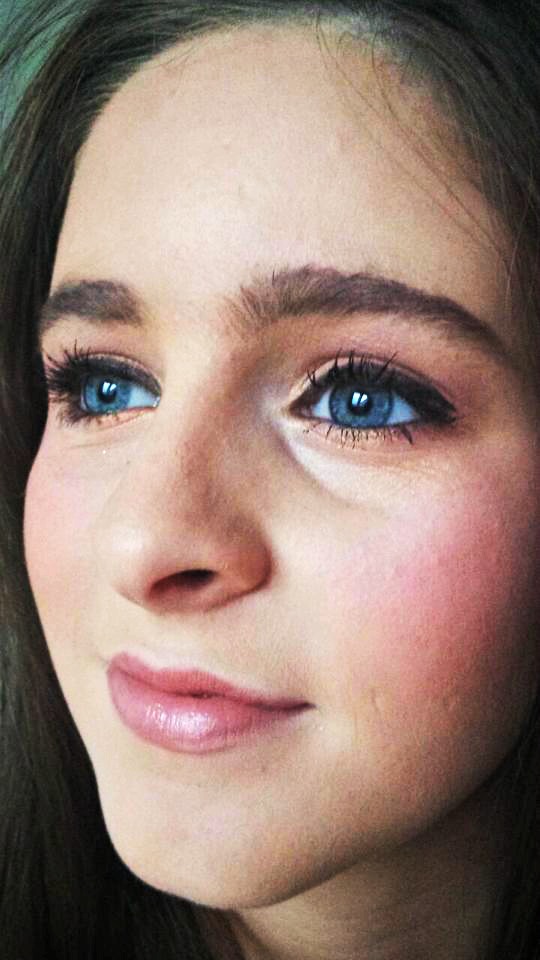
My next look was a bit different but the colours used still made my models eyes pop beautifully !

10622742_68533668822k3297_4028467004359377053_n

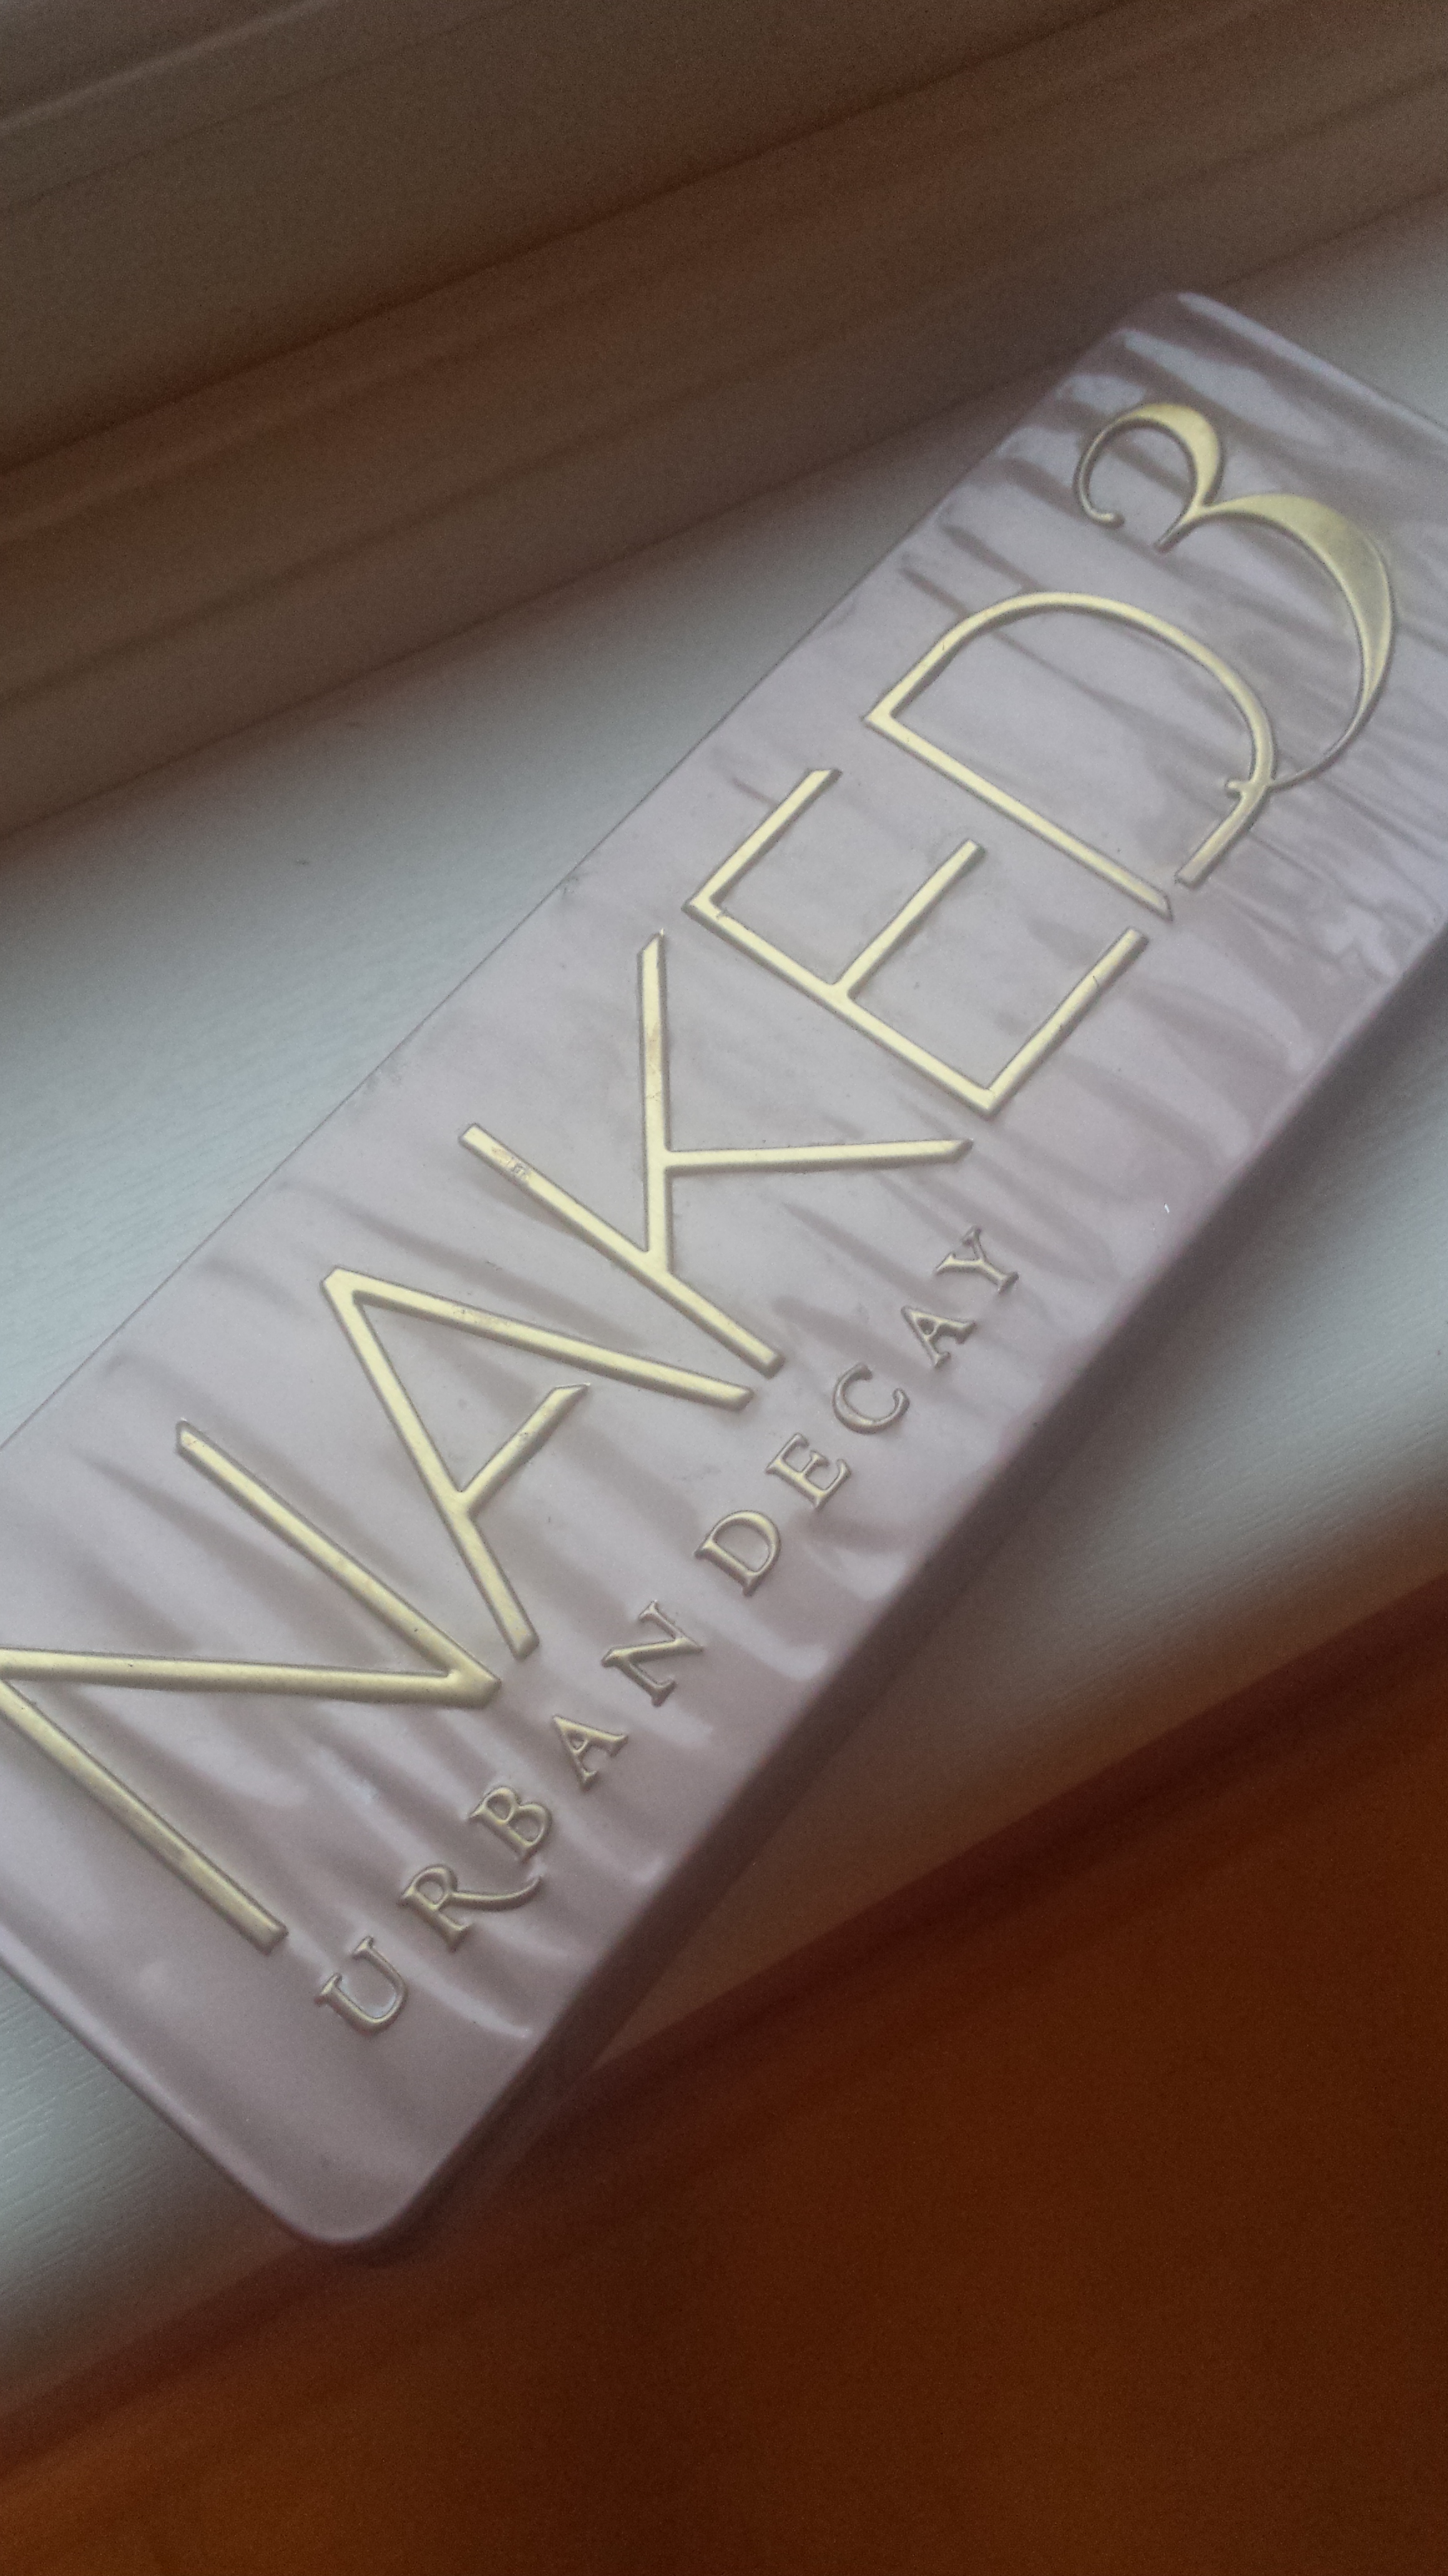
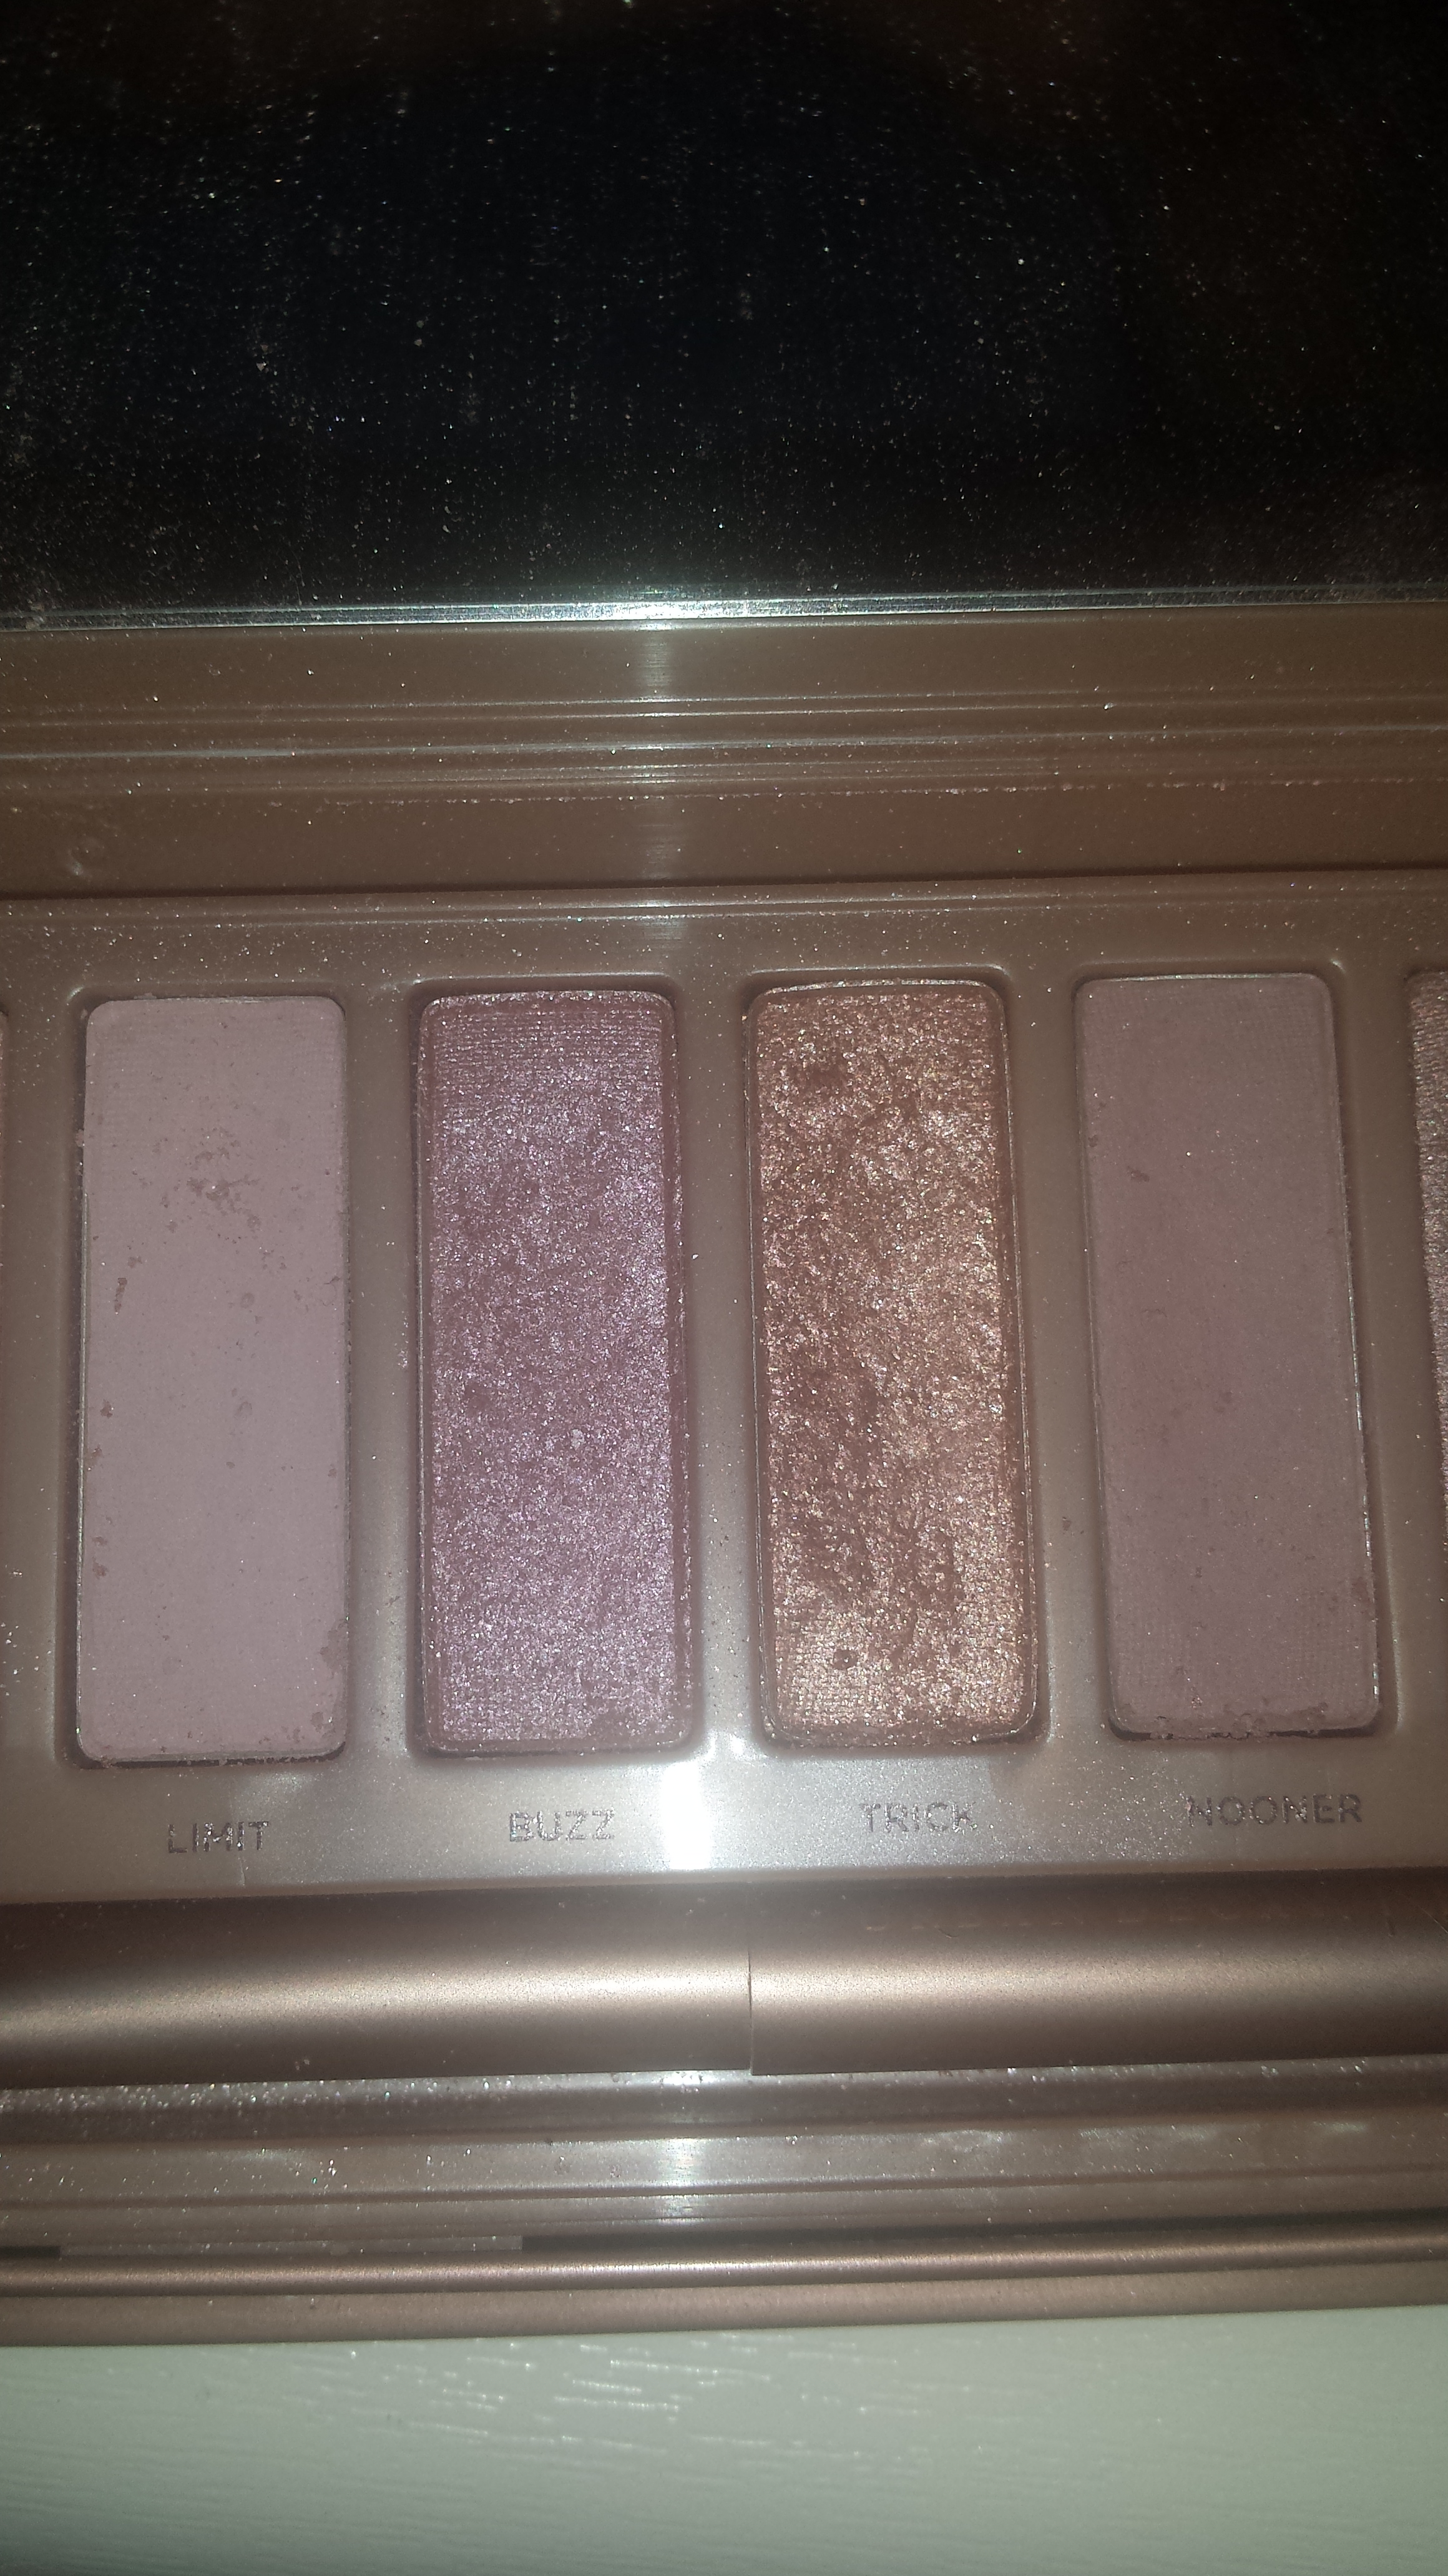
The shades I used in this look where a little bit harder to find. I mainly used Urban Decay. However these shades are easy to find in christmas eyeshadow palettes and the likes (Bonus – Christmas season and all that ) ! 

  1. Firstly I began with my over lid shade , using Urban Decays -Naked palette 3! I used Nooner for this and followed the same steps as I did in the look above. Blending the shade forwards and back until I was happy with the consistency and depth.
  2. Next I went in with Urban Decay again, using the same Naked 3 palette and for this I used ‘Blackout’. This is a rich blackcurrant shade with plenty of pigment and sparkle! (Perfect for Christmas girls). I used my Sigma pencil precision brush for this application. Creating an almond shape as I went along as my models eyes were between droopy and deeply set! As before I blended this shade out with my fluffy blender brush. However as my model had a specific eye shape I had to make sure to blend upwards at all times and slightly inwards to pick the eyes up so to speak.
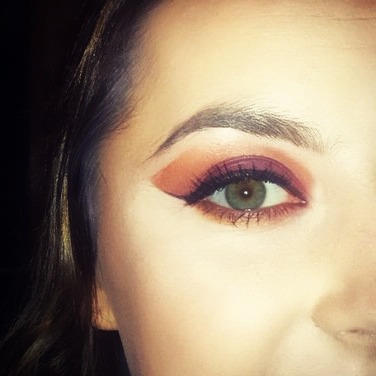
  3. For the lower lash line I applied the gold glittery shade I used in the first look. This was Barry M’s sparkle dust in ‘Gold’.
  4. This eyeshadow is extra pigmented and therefore take care with fallout when using this beautiful colour.
  5. I then went in with the tan/bronze colour I used in the last look also. I used my ‘Hoola by Benifit’ Bronzer for this. Best of both worlds Heh.
  6. I blended these two shades out with my E40 Sigma blender brush.
  7. Finally I went in with my NYE liquid liner to the top lash and my MAC ‘Feline’ Kohl pencil on the tight line and waterline.
  8. I completed this look with lashings of mascara.

And that’s it guys. A simple and easy way to make Blue Eyes Pop ! 🙂 Hope you enjoyed and don’t forget to comment, follow and like !

20140829_195207jh               10641043_685336821k556617_207967128947169335_n

0

Deep Plum And Caramel Eye ♥

Yesterday I decided to create a makeup look using complimentary colours, that compliment my Green eyes. I decided on Deep Plum eyes with a caramel and vanilla transition. I love these colours together so much and they are so flattering in person! The deep plum colour really makes green eyes pop while the caramel colour gives the eye a smokey look and also helps to take attention away from the deep plum in a way that it’s not to Wow there’s your eyes kind of look.

  1. I began as normal with my foundation routine.
  2. I then applied my primer – this time I used my concealer as a primer (MAC pro longwear concealer) This is great as a primer as it’s quite sticky and heavy, and so it catches pigments beautifully.
  3. I then applied tape to the outer corners of my eyes to catch any fall-out and create a sharp-crisp edge.
  4. To begin I went in with a caramel based colour (this would be more orange/yellow toned than pink). I used my Fuschia palette and choose the nearest colour to caramel ‘CM18’. I buffed this into the eye forwards and back until it was blended in using my Sigme E40 brush.
  5. Next I took an Orange pigmented eye-shadow and applied this to my crease using a shader brush. Then I went in with my blender brush again and blended everything out.
  6. Finally I took a deep plum shade and applied it to the lid using my flat shader brush. This shade I took from my MAC palette although there was no name attached to the shade. A shade similar to it would be ‘3P’ from Fuschia.
  7. I continued to blend all of this out until I was happy with the consistency of the blend.
  8. Next I created a cat flick using my MAC liquid liner.
  9. I then applied eyelashes using ‘Ardell lashes in beauties’.
  10. For my bottom lashes I applied mascara and took my Sigma pencil brush in with the first shade ‘Caramel’,blending it forward and back.
  11. Next I applied that orange shade blending it back and forth with the same brush.
  12. Finally I applied the deep plum shade with a small flat shader brush and blended it just below the waterline into the two previous colours.
  13. To emphasise the colours in this look I highlighted under the eye very heavily to include the flat of the nose and forehead. For this is used ‘Crowne-contouring kit’ and Ben Nye Banana Powder over this highlight.
  14. Finally contour the areas you wish to to include the cheekbones/nose and forehead.
  15. I applied Mac lip-liner in ‘In Synch’ and ‘Faux’ lipstick by Mac on top.

photo 1 (1) photo 2 (1)

And above is the result ! Don’t forget to follow and get in touch !


0

Big Bold Sparkly Eyes !

In this post I’ll be talking all about how I emphasise my BIG green eyes. I use this look on a regular basis as it’s my favourite eye makeup and it’s SPARKLY !

For this look I apply my base as I would normally every day an then I start the fun part. Zee eyebawlss.

1. Apply an eye primer all over the lid. For this I used urban decays ‘sin’ as it’s got sparkly pigments throughout and complements shimmery shades beautifully. This primer is my favourite of all time and I’d highly recommend it . But that’s for another day !

2. Now take a matte brown espresso type shade and go in to your crease with it. This will add some definition to your eyes as your going to be using such a light shade all over the lid. Any dark brown will do however I used my MAC dark brown shade in ‘espresso’ . LAVE it :)!

3.now the fun starts. I took my Barry M gold shimmer dust pigments and applied it to the lid using any flat eyeshadow brush . I then blended this all in to the dark shade I use earlier using my sigma e40 blending brush. This is an important step as you don’t want the shadow to look clumpy or make it look like it’s just sitting there screaming hi . Haha
Continue to repeat these two steps, applying the gold pigments and blending to build up the colour to your desired effect.

3. Next go in with eyeliner. In this look I’m using ‘MAC-Feline’ kohl pencil.

4.Finally apply lashings of mascara and /or fake eyelashes. I only applied mascara here as this is my everyday makeup.

IMG_1348.JPG

IMG_1349.JPG

IMG_1344.JPG

Thanks for reading, don’t forget to follow for more updates!

0

Nail’d It…!

Its Nailzzzz’in  time !

This post is basically going to be ma nails.

Over the summer Ive been busing with nail appointments for ‘Shellac’ and ‘Gel polish’ manicures. Below are just a few of my favourites..

  1. Using Orly Gel Fx in ‘Lola’ I created this pretty in pink look with nail art pens to add to the girlyness of the whole thang

1422491_685336884889944_7265738291547381030_n

2. Using ‘Orly Gel Fx – Gumdrop’ Another lovely pastel, summer colour. Its super bright in real life as well which is so flattering and its such a unique colour.Laaave ❤

10384342_683633075060325_5053150271232132827_n

3. Next is ‘Orly Gel Fx- Seashell and Gelish -June Bride’ This combination is really flattering and dressy. Great for events like a wedding or a graduation. Maybe even a debs if your dress is a similar colour !

16393_716182518472047_9037864312282109419_n

4. This next one is ‘Gelish -TikkiTikiLaranga’ LOVE this colour. Great for summer holidays. This is what I used myself on holidays this year as well as on four other clients . So popular but you can see why,the colour is so vibrant it jumps out of the screen!

10426678_671351599621806_3379259405282919990_n

 After 3 weeks there were no signs of chipping on this clients hand either as seen below. Only regrowth. BENIFITS.

10599466_682141285209504_7609675020189582751_n

Finally here are some of the nude nails I done over the summer using ‘Gelish- Tan’ and ‘Gelish -June Bride’ cobo’s and ‘Gelish – Glitz combos’. Most of the nudes Ive done this year were for Debutantes , who doesnt love a nude nail! I also have some suggestions combinations I done using ‘Gelsih- Sleek White’ and ‘Gelish -Im brighter than you think’along with some nail art I done on clients and myself…

10592839_677930175630615_7123072843757653121_n 10565284_677930148963951_4793471327214898980_n 10603621_675882445835388_1871652451147423624_n 10561582_675881342502165_629476540337786394_n 10552397_665882266835406_4913745170238780950_n 10599567_683632825060350_5250414716987222135_n 10534087_675881135835519_3542573283730751356_n10562970_680755698681396_7609836561490452261_n

This final look I created a few days ago on another client and I really loved it. Its a combination of ‘Orly Gel Fx – Seashell, Lola’ ,’Gelish-June Bride’ and nail art designs which she wanted. Of course I was more than happy to oblige love love love nail art requests! 

10501845_717232505033715_1706535449963322094_n

My next nail post will definitely be involving some Winter colours but for now Im just not ready to let go of the summer pastels ! Cry cry.

Don’t forget to get in touch and share your favourite colours.

Nicholle-Marie

0

Urban Decay – Naked 3 Palette Makeup Look

I decided when my original Naked palette ran out id go ahead and buy a new one. However with so many different palettes out there, The original Naked palette, Naked palette 2 , Naked palette 3 and then the Naked basics palette, its hard to choose  ONLY one. I took a leap of faith however and went with the Naked 3 as its the newest out there.

20141111_154408

This palette appealed to me anyway as I Love love laaavee pinky tones. (Noway I can hear you all sigh haha) .

20141111_154339

Base –

For my base I used all the steps I usually do matching the correct foundation to my models skintone and obviously basing the highlighting colour and contour around her skintone. The contour I used on this model was particulary heavy as that was the desired effect. (See my post on contouring and highlighting here for more info… ) —> http://blushinbrownies.com/2014/11/11/contouring-like-a-pro/

10485237_665882710168695_4128324753250209996_n

Eyes –

For this look I used four colours from this palette. ‘Buzz, Nooner, Trick and Limit’

  1. First I applied Urban Decay’s ‘Eye Primer Potion’ all over the lid. Or as I call it,  my Magic wand!
  2. I then used my Sigma Beauty Precision Angeled P84 brush and packed on the shade ‘Buzz’ on the outer crease.
  3. Next I took ‘Nooner’ and applied it using the same brush just above where the crease is to create the illusion of a bigger eye. This is 10000000 gillion , million my favourite colour in this palette.
  4. I then blended that shade out with my Sigma E40 blending brush.
  5. Next I took the shade ‘Trick’ with my P86 tappered blending brush and packed that warm glittery gold shade on to the centre and inner corners of the lid.
  6. I took my E40 brush back out and blended these colours together moving forwards and back to create a smooth transition.
  7. As a transition colour I took ‘Limit’ and applied it above were ‘Nooner’ stopped blending it up to the brow bone. (Limit has a lovely glimmer to it which also acts as a highlight which is perfect for the brow bone, brows on point)
  8. Again this colour was blended out and upward towards the brow bone , creating a lovely transition.
  9. For the eyeliner I used a very light brown shade from Fuschia ‘Mythiology’ as a black eyeliner would be too much of a contrast with these shades.
  10. Lashings of mascara using Benifit’s ‘Theyre real Mascara’

Brows –

  1. Using ‘Benifits Brow Zings’ in the lightest shade.

10511350_665883133501986_858198508757267437_n

The finished look of the base and eyes came together and looked gorgeous on my model and overall Im very happy with the results of the Naked 3 palette!

10154012_611499005607066_214749565_n

Dont forget to follow Blush’inBrownies if youd like to see more and id love to hear from you. 🙂

2

Contouring Like a Pro..!

Contouring and highlighting has got so big over the last few years and its no longer a secret for us Makeup artists. Now every Tom, Dick and Harry is doing it and I’m pretty certain your nana is too!

To begin with make sure your face is completely hydrated and B E A UTIFUL looking as youll be using a hell of a lot of creams or powders. Or Both if your like me. Cheekbone obsessed!

Apply a primer that suits your skin, depending on your skin type and needs. I use a number of primers depending on how my skins feeling that day. On this look I used Benifit ‘Porefessional’. Next apply your foundation. I usually always go for full coverage when contouring as it gives better results. And hey who doesn’t like to look like a fresh faced porcelain doll..hahaha.

For this I have used Estee Lauders double wear foundation. I then go in with my  contouring kit, this one I am using is from Sleek Makeup. I applied the second darkest shade in the palette to my temples, my cheekbones, my forehead, my nose and under my jawbone. Scuury Scurrray…

I then took my highlighting colour, I am using ‘MAC pro longwear concealer’ in NW15 and applied it to the base of my nose, my forehead, under my eyes (to include the inner C) and to my chin.

I blended these shades out in two goes. First blending my contour out into my foundation and then blending out my highlight. ( What a scary looking girl haha )

photo 1

For extra depth and effect I always go in to my cream contour with powder contour. My personal favourite is Hoola bronzer by Benifit however any completly Matte shade bronzer will do. I blend all that contour in using my Sigma contour brush and then add blush. Making sure to blend the blush into the contour correctly.

photo 2

All thats left to do when you have all that done is to do the rest of your makeup as desired and thats you good to go . Below I have done my eye makeup the way I wanted to using my Fuschia colours and adding a flick.

photo 3

Id love to hear your thoughts on this post and what your everyday makeup routine is.

Dont forget to follow Blush’inBrownies and get in touch ! 🙂

0

Gold Smoky Cut Crease !

Today I wanted to share a makeup look I did a while back. Its my favourite going out makeup at the minute and its very easy to re-create. In this look I used MAC, Makeup forever, Barry M and Fuschia products.

Lets gooooo…

BASE –

  1. I started with my base using L’oreal Lumi Magique pure light primer all over my face
  2. Foundation : Using a combination of Mac studio fix fluid foundation and Make –up forever’s HD foundation in the colours NW15 and soft beige. Apply all over face taking care to blend blend blend outwards and upwards into your fake tan on your neck area if you’re wearing any. If you’re not make sure to blend perfectly to avoid any lines and colour mis-haps. Oompa Loompa face and all that.
  3. Using MAC Pro-Longwear concealer in NW15 apply as a highlighter in the shape of a triangle under the eyes towards the lips, on the base of the nose, towards the forehead and on the chin. I use my finger generally for this part as I like my face to be extra bright in these areas and I sometimes think a blending brush can lose this effect. Make sure to add this concealer to the inner ‘C’ of the eye to minimize bags under the eyes. A BIG problem for me personally.
  4. Taking a contouring kit. I use CROWN brushes contouring kit. Take the darkest shade or shade most attractive to you and add said shade to your temples, directly under the outline of your cheekbones and forehead (making sure to keep the highlight just above your nose).
  5. Blend blend blend in to your current foundation using a large Kaboki brush. You don’t need to do this next step but I always do because I like my makeup to be as airbrushed as possible..hello Barbie. Haha
  6. Apply the contour colour again, (in a lighter shade this time than the colour used for your cheekbones/forehead/temples ) to the outer part of your nose , the nostril area and to the lower parts of your jaw (taking care not to hit your neck). Again blend blend blend using a skunk brush.
  7. Next I took Makeup forever HD setting powder. This is an amazing setting powder as it contains light reflecting pigments in order to show the colour of your foundation in photographs even when in flash photography. LOVE IT.
  8. I applied this under my eyes, under my cheekbone contour and to my chin. Leaving the other areas of my face as I wanted a dewy glow.
  9. I then took my SIGMA contour brush and applied HOOLA bronzer over my already contoured areas to deepen it and add more depth. (Ill never look like Kim Kardashian but a girl has to try )
  10. Blush was added to the apples of my cheeks and blended back to my contour in the shade ‘Just glow’ by Fuschia. This is a gorgeous mineral pigmented blush which also is ahhhhhmaze at picking up light reflecting colours.

Eyes –

  1. For the eyes I applied Urban decay’s ‘original’ eye primer to my eyes.
  2. I then took ‘Gold dust’ a pure pigmented glitter eyeshadow by Barry M and applied it all over the centre of my lid. Its gorgeous on any eye-colour .
  3. Next I started my cut crease. Applying Fuschia’s gel liner in the shade ‘chocolate’ above were my natural crease would be. I created a half-moon shape, then taking my SIGMA E47 shader brush I blended that colour upwards. You can use any dark coloured eyeshadow mixed with water for this or gel liner .
  4. As a transition colour I went in with MAC ‘Era’ and blended that colour on top of the gel liner fading into MAC ‘Arena’. This is a tedious process and needs a lot of blending to get the correct cut crease look so I used my Sigma tapered blending brush in E40 to achieve this quicker. You may need to start off with a smaller blending brush first however until you get used to the blending as its worth the long process to get that perfect cut.
  5. For my inner crease I applied MAC ‘Espresso’ blending that back and forth. Adding more and blending again until I was satisfied with the depth.
  6. Next I created a cat eye flick using ‘Wet N’ Wild’ glitter liner in ‘Black’. It’s a black liner with a tint of glitter in it.
  7. I applied lashes using Eyelure ‘Volume 100’ lashes.
  8. I then filled in my lower and upper waterline using MAC ‘Feline’ eyeliner.

1486823_62113001131063nnn2_6796480563956969180_n

Brows –

  1. Using Benifits ‘Brow Zings’ in the shade ‘Light’ trace out outline using the gel and an eyebrow brush. I use Sigma E68.
  2. Colour in patches of eyebrow that have sparse hair using the powder.

Lips –

  1. I applied Makeup Forever Aqua Waterproof Lip Liner in ‘15 C Pink’ .
  2. Finally I applied Makeup Forever ‘Lab shine Chrome shine Lipgloss’ in ‘M16 Frozen Pink’.

And that girls and boys was my simple gold glitter cut crease makeup look.!

1486823_621130011310632_6796480563956969180_n

If you have any questions or comments and liked this post or want to see more makeup tutorials please leave a comment below.

1

No7 Cleanse & Care Eye Make-up Remover

I recently bought No7 cleanse and care eye make-up remover as my normal simple eye makeup remover had ran out and I thought I might switch things up a bit.

My first impression was that the packaging is very flattering. The use of a translucent bottle to see the blue product inside is a great idea. It makes it more attractive and vibrant. The writing on the outside of the bottle is also great. A very simple idea with a great look about it.

The first time I used this product I made sure to wear lashings of mascara, along with heavy eye shadow and eyeliner. When I took of the lid and tried to squirt out the product onto my hand I realised that a cotton pad was one hundred percent necessary with this product. HOWEVER the pump itself on the product is awful, half the product I pumped out would go over the bathroom sink instead of in my hand. Not a good time NO7, not a good time.

20141105_162626

It’s a more oil based product compared to my usual creamy based makeup removers but that didn’t worry me too much and it shouldn’t worry you either unless you have a specific skin type that should not be using oil based makeup remover s like an oily skin type. This makeup remover is fine for sensitive skin and eyes as I have very sensitive skin and found no irritation at all. Although as you all know everybody is different and don’t take my word as the gospel either ….well too much har har har.

Take 2 was followed by a cotton pad and I was pleasantly surprised. This makeup remover certainly cut down on my heavy duty eye makeup fairly quickly and my drag queen eyes phase didn’t last too long while removing my mascara.

I bought this product in boots for €11.00, yes I know it’s on the pricy side but I realised when using it that you only need a small amount of product on the cotton disk so it’s very affordable when you think that this product may last up to two months.

It was quite a change for me as I’m used to using more of a cream based eye makeup remover  however I didn’t find the change as scary as I thought I would…. goblins and ghosts hiding at the bottom of the bottle and all that. Overall my

Review of this product was good. The product itself is brilliant cutting down on makeup and doing its job correctly. However the design of the bottle could use a little oomph to make it easier to use and more people friendly.