0

The Brits 2015

BRITS2015_lg_950x440-1Hey guy’s!

So last night was the much anticipated Brit Awards 2015. I must say I absolutely loved this years Brits and thought Ant & Dec did the most amazing job presenting. They didn’t hold back when it came to the sarcastic comments on other artists, banter and interviews with the tipsy celebs . The whole ceremony was much more lighthearted and enjoyable as a result. While watching you just felt like everyone there were friends which was a great vibe.

The style was amazing at this years awards. My favorite’s were Rita Ora, Ellie Goulding and Taylor Swift.

All three ladies were rocking long , sophisticated gowns and looked unbelievable.

ff543ac4b1d8f01fe3f206e57f17038789c681ed

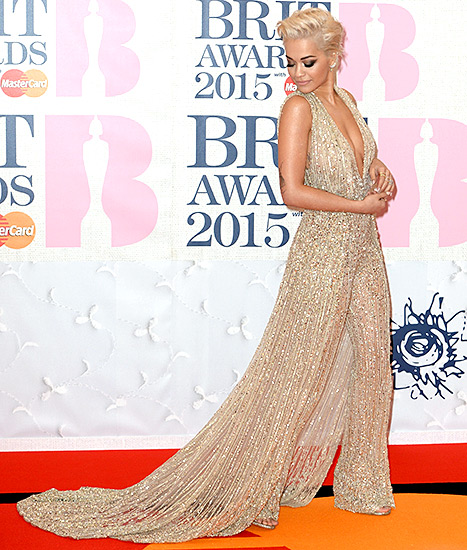
Rita Ora arriving at the Brit Awards 2015.

Rita Ora

Wearing a fabulous gold and silver plunge neck gown by Zuhair Murad. She combines elegance and sexy in one with this fabulous choice. Rita Ora is looking hotter than ever this year, days before she was sporting a risqué sheer Donna Karan dress that left little to the imagination. She’s definitely one to watch for 2015!

music-brit-awards-2015-ellie-goulding

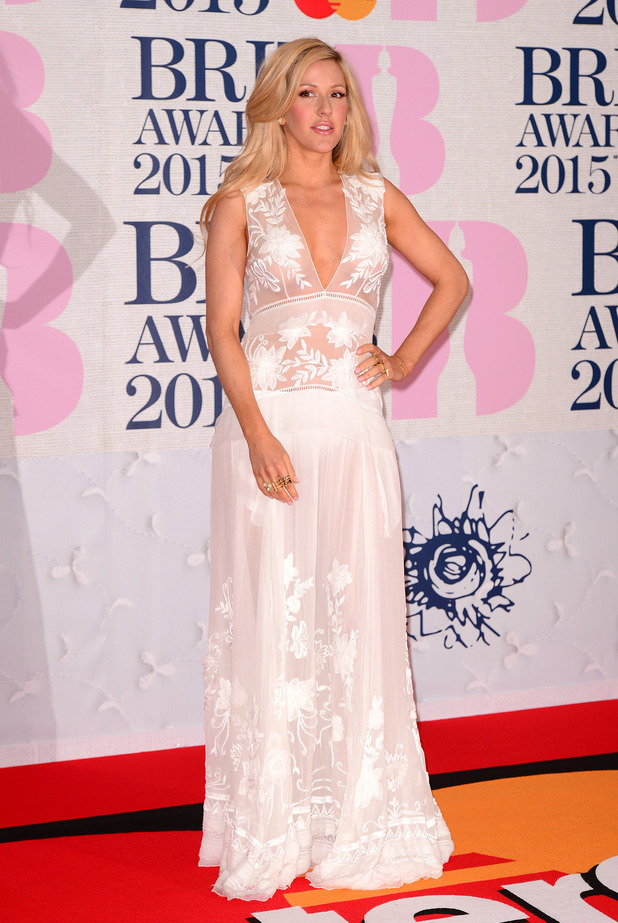
Ellie Goulding at the Brit Awards 2015.

Ellie Goulding

Wearing a gorgeous summery white Alberta Ferretii gown with a sheer plunge neck. Ellie looks classy, elegant and pretty in this gorgeous number. Although Louis Hamilton nervously suggested Ellie looked like she was going to a wedding, I certainly don’t think she looked that way. In fact I think that pale pastels and white should be celebrated this spring as the beginning of the new season emerges.

brit-awards2-723x1024

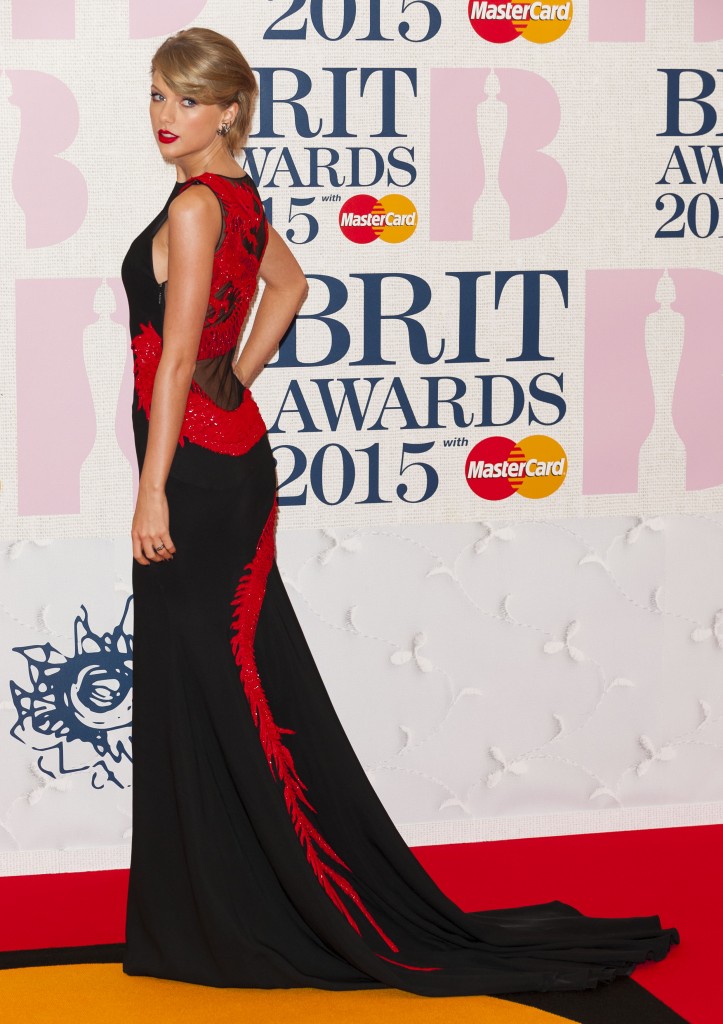
Taylor Swift arriving at the Brit Awards 2015. Wearing a beautiful Roberto Cavali gown.

Taylor Swift

Wearing a jaw-dropping black & red floor-length Roberto Cavali gown Taylor looked stunning as usual. She pulls this look off so well combined with her signature red lip! I adore this look so much , the trail  had a dragon design up along the back of it which sealed the look perfectly.

As for the men of the night they were looking equally as fab! Sam Smith was my personal favorite, he was wearing a gorgeous blue Casely-Hayford suit as he arrived and looked handsome as ever

2615A68100000578-0-image-m-9_1424887901888

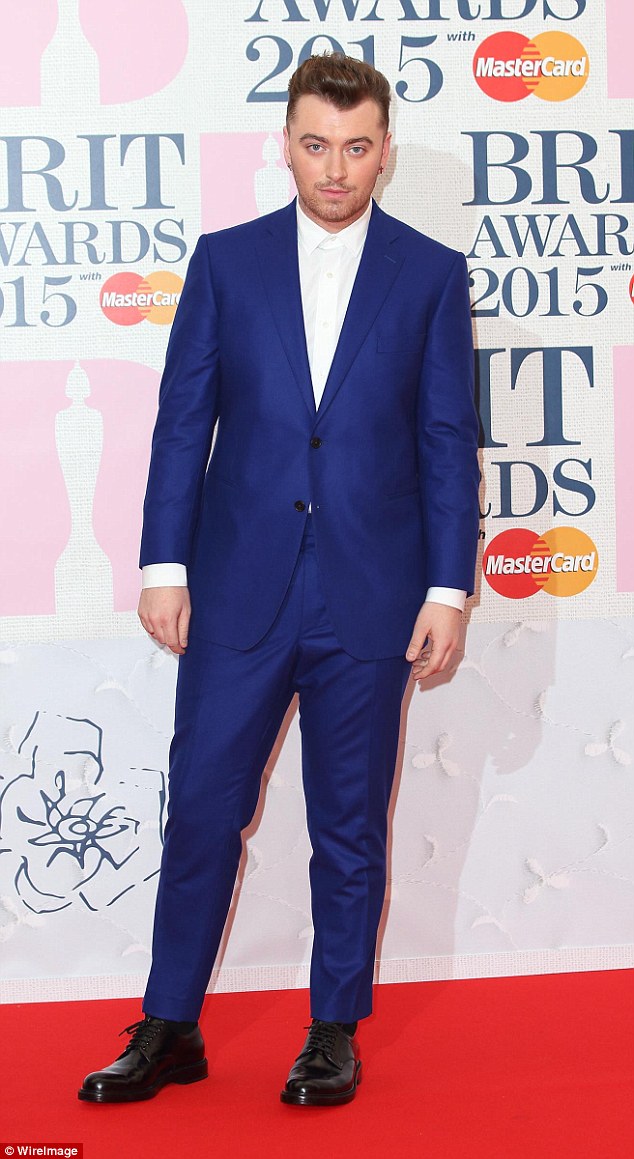
Sam Smith arriving at the 2015 Brit Awards

.

sam-smith-brit-awards-red-carpet-2015-performance-1424897123-custom-0

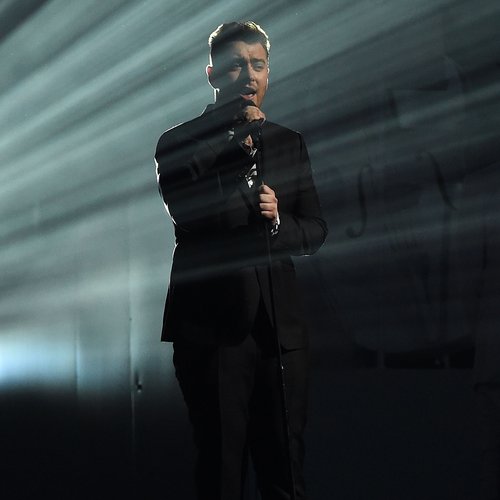
Sam Smith signing ‘Lay Me Down’ at the Brit Awards 2015.

Performances

Favorite’s Of The Night:

As performances go this years Brit Awards were phenomenal! From Ed Sheeran to Madonna , it was a top-notch night.

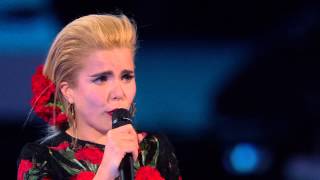
My personal favorite performance of the night had to have been between Sam Smith and Paloma Faith. I simply can’t put a number one winner to this one. Sam’s voice was seducing and captivating while Paloma’s was hypnotizing and had an almost eerie feel. Sam Smith performed his song ‘Lay Me down’ while Paloma Faith sang ‘Only Love Can Hurt Like This’.

music-brit-awards-2015-paloma-faith-02

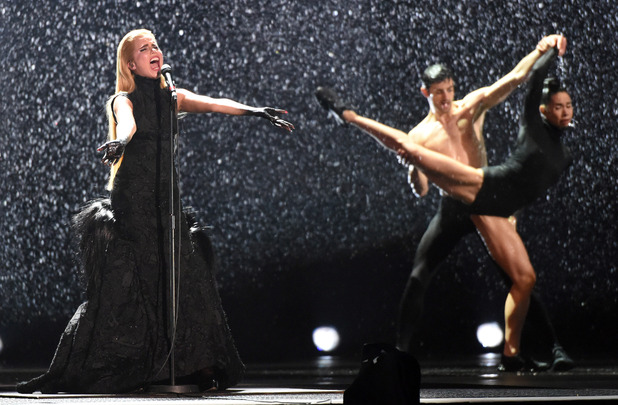
Paloma Faith singing ‘Only Love Can Hurt Like This’ at the Brit Awards 2015.

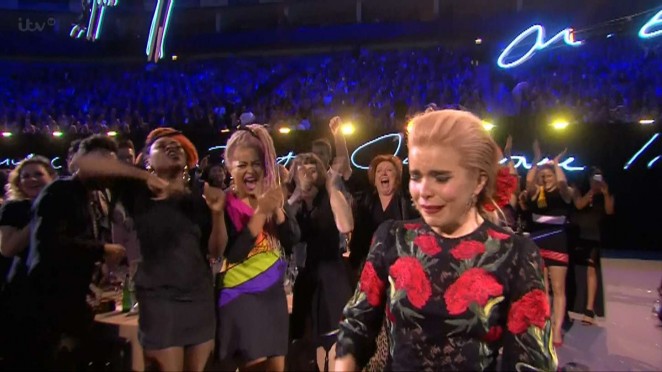
Paloma Faith also touched heart strings by shedding tears at her win of ‘Best British Female’. She was so touched by the award after her hard work over the last 14 years. Its her first ever Brit Award, which completely baffles me as she is an amazing, unique artist with so much soul and depth. The emotional and heart warming acceptance speech confirmed for me once again why I love her so much.

mqdefault Paloma-Faith--2015-BRIT-Awards--07-662x372

Least Favorite Of The Night:

My least favorite had to have been Kanye West’s performance. For me I just didn’t get it. There was what I could only describe as a gang like group on the stage shouting, cursing and blasting fire into the air. Perhaps the performance may have been better if the audio did not cut out every time Kanye swore but personally I wasn’t feeling it at all.

The Brit Awards, Show, O2 Arena, London, Britain - 25 Feb 2015

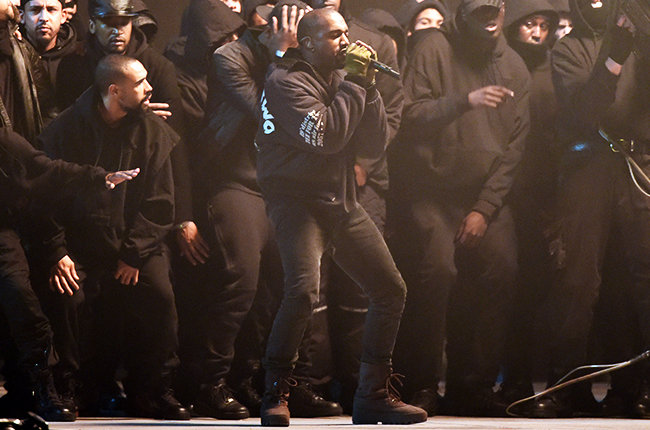
Kanye West performing ‘All Day’ at the Brits 2015.

1000

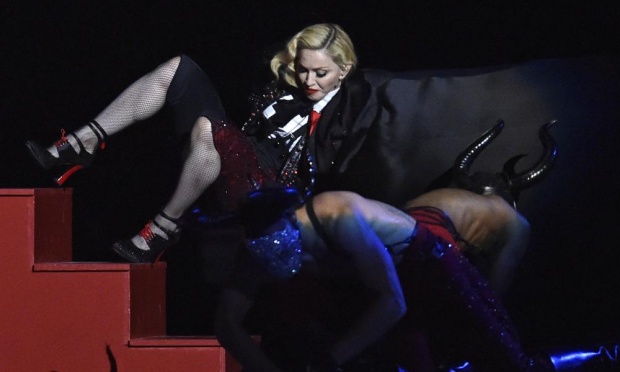
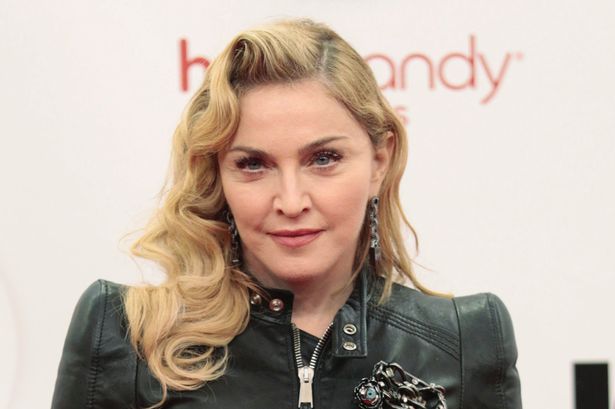
Madonna falling down the stage after a wardrobe malfunction.

Madonna’s performance was another one to watch! Everyone was anticipating her return to the Brits after more than two decades. In everyone’s mind Madonna could do no wrong with years of industry experience behind her. However we all cringed when a wardrobe malfunction occurred and she was pulled back of the steps on the stage to the ground. She landed on her back and hip with a thud as all of us watched on to see if she’d recover. Like the pro she is, she got up and carried on, ironic as the lyrics in the song stated just that! Her song ‘Living For Love’ could not have been more suitable to this stage accident as she received the love from the public on this unlucky moment. Twitter took out with love and best wishes as well as worries and concerns for the singers hip. Thankfully all seems to be well with the superstar as she posted on instagram later that night.

Armani hooked me up! My beautiful cape was tied too tight! But nothing can stop me and love really lifted me up! Thanks for your good wishes! I’m fine! ❤️#livingforlove

houses

Overall the Brits 2015 were a complete success, creating media attention, social networking frenzies and viewers tuning in all over the world to watch this fabulous event. One Direction sealed the night by winning best video of the year award and Simon Cowell was more than happy to collect it for the boys. I was at the edge of my seat for most of this years awards, with the best lineup of artists yet, all up for the same award. I can’t wait until next years Brits, I’m sure there’ll be even more to come!

Thanks for dropping by, i’d love to hear from you. Let me know your opinions and views on last nights show!

0

Threading ❤️

Hey there,

So recently I done a threading course in Portabello Institute in Dublin. It was a one day course and in it I learned both the mouth technique and the hands technique. I completely fell in love with threading from that day onwards. It’s so easy and leaves the area perfect!! 

You can even use any kind of string you have lying around the house, although my advice would be to use the professional string used for threading which would be ‘Vanity threading thread’. You can buy this from your local Sally’s for as cheap as £2.69. Can you imagine what an amazing benefit this price would be to you in comparison to the price of wax, wax strips and spatulas? It literally doesn’t even compare. 


The technique is so-so. It’s all about the practice. I mean I felt confident enough to take the scruff of someone’s eyebrows after the course but I wasn’t ready for a re-shape there and then. Like everything it takes lots and lots of practice.I did however take a whirl at doing my own eyebrows and they turned out pretty good. 


I’ll also attach a photo of my arm which was practised on for most of the day. There’s a noticeable difference let me just say that haha.


Look at how different the amount of hair on my arm is . It’s crazy. And yes it is somewhat embarrassing to have an arm half bald and the other gorilla like – I’ve waxed them since. My favourite technique to use was the mouth technique, I just prefer it as I’m one of those people who can’t move both hands at the same time haha. So overall I’m extremely happy with threading. It’s definitely a skill worth looking into if your in the beauty world already and extremely beneficial!!

0

50 Shades Of Grey Review (The Movie)

So over Valentines season I’m pretty sure quite a few of us went to see this ‘steamy’ movie with our nearest and dearest. While I did get butterfly’s in my stomach when ‘Mr Grey’ came on screen I must say I wasn’t overly impressed. In fact, quite the opposite, I was extremely disappointed! So to get this show on the road I’ve devised a list of words I thought during this film, I’ll let you all decide your own opinions on the film itself from then on.

  1. I’d let Mr Grey see me anytime.
  2. She really needs that fringe cut.
  3. What’s she actually wearing to this interview?! You’re going to see MR GREY!
  4. Worst interview ever…oh..my..god.
  5. No seriously whats she wearing??
  6. Stop biting your lip.
  7. What kind of interview is this….
  8. She literally makes orgasm noises at any and every possible moment she can.
  9. WHY
  10. She’s a cute D.I.Y sales assistant to be fair.
  11. Worst photo-shoot ever…bit of abs please love.
  12. You brought her on a helicopter, how is that NOT romantic?
  13. Well that explains the fringe, V word!
  14. HMMMMM shteamyyyy.
  15. That was good, I liked that.
  16. THE LIP WHATS WITH THE LIP!
  17. Oh my god Playroom, we are going to see the playroom.
  18. Would ya quit….run away girl run.
  19. Id take that long to sign a contract too.
  20. He’s very very pushy!
  21. Why would you enjoy being told what to do?
  22. Sorry one bed or no bed Mr.
  23. Awkward father – boyfriend bonding…or lack of.
  24. ..that ice looks nice.
  25. Mmmmmm
  26. She’s going to the playroom, what is she doing!!
  27. Its a feather girl stop biting your lip.
  28. He touched your face why are you moaning.
  29. You moan way too much.
  30. I’m pretty sure a plastic bag with your weekly shopping would make this woman moan.
  31. cringe.cringe
  32. She needs a wax.
  33. No not there..
  34. Oh my god no..
  35. Hahahaha no.
  36. More hair oh my god..
  37. Ok leaving the cinema now.
  38. Full frontal ok ok cringe

Yes boys and girls I left the cinema early on this one. I literally couldn’t handle the cringe and over the top unnecessary moaning any longer. I mean come on if you’ve something to moan about by god go to town with it, but this was extremely unnecessary and so disappointing. I’ll let you all make your minds up on this one, but as for me i’ll stick to what I know best, and bondage isn’t quite one of them !

50-shades

0

The Bucket List 2015

The Bucket List For 2015 


1. Number one on my bucket list is definitely to grow my hair past my shoulders. I’ve been trying to for years but this year is the first time I think it’s achievable. I’ve stopped dying my hair completely for the first time in fooooevs.

2. Two would be to learn a new skill, I’m thinking yoga/a new language/something practical . The worlds my oyster! 

3. Travel. Travel. Travel.

4. Do one new thing every week. Whether it be reading a new book, going somewhere new or getting my nails done a new colour. Whatevsss.

5. I really really want to go visit Italy this year. Rome possibly!

6. Sort my career goals out…please god let me achieve this.

7. Blog every day, creative juices at the ready.

8. Be active, be healthy, be fit. 

9. Get a summer beach body. This will honestly be the hardest haha

10. Buy a pet of some distinction 

11. Be more spiritual, Id love to learn reki also

12. Be happier.

13. Go for a walk most evenings

14. Learn to drive.

15. Read more. 

And they are my 15 resolutions for 2015. 

Let me know if you have any, or if anything is similar to mine. I’d love to hear from you all.


0

Intense Smokey Eyes ♥

Good Morning Ladies and Gents,

This post is on gorgeous smoked-out eyes. This look is extremely intense and over-the-top much like would be seen in ‘TOWIE’ or ‘Geordie Shore’. I know many girls out there,including myself are obsessed with this type of make-up at the moment and its seen everywhere on social media!

So for this look I began with the eyes first, I applied foundation to the eyes and underneath the eye area, I then applied powder so that when I applied the eye-shadow it wont move or slide.

I then went in with a nude base eye-shadow. For this I used my fuschia palette, taking a matte cream colour. You can use absolutely and cheap shade for this step.

Next I applied a deep-purple shade to the eye,all-over the lid continuing to add more and more depth of colour until it was prominent and made the eyes pop. I then took my undereye brush and applied this same shade under the lash line.I took this colour lower than I usually would for the illusion of bigger eyes and to draw attention to the eye colour.

I blended this shade out -in the shape of the models eye.

Next I took a matte black shade and repeated the previous steps.For this shade I made sure to leave a halo of the purple shade above the black colour. I continued to apply the black shade adding depth of colour and blending the shade into the lash line. I then took my under eye pencil brush with some of the matte black shade and applied it to my lower lash line, this time the black matte shade was closest to my lashes and I also left a Halo of the purple shade to the bottom lash-line. Again this draws attention to the eye colour.

I applied gel eye-liner to the upper lash line and lower lash line.Using my under-eye pencil while this gel was still wet,I blended the gel out to seal the eyes. I then applied this gel eye-liner to the waterline in one quick swoop to prevent discomfort for the model.

Finally I added lashings of mascara to the bottom and top lashes and then I finished the look by applying Ardell Fake Eyelashes.

10641000_1729343727291452_882754831442824507_n

Above is the finished look 🙂 Hope you enjoyed, don’t forget to like,comment and follow. 

Nicholle-Marie x

0

Burnt Orange Eyes ♥

Hello hello helloo,

Today’s post is on an extremely flattering Winter trend eye-shadow shade -Burnt Orange. For this look I combined a nude base colour (matte) my Inglot shade 383, and a glittery pigmented eye-shadow with hints of yellow gold through it.

  1. I began by taking a matte-nude eye-shadow base from my Fuschia palette. Any shade that is a nude-cream or pale pink/lilac-cream will do. I applied this from my lash line into my brow bone with my sponge-tip eye-shadow brush.
  2. I then began to create a cut crease using my Inglot shade 383(Burnt Orange). I used my flat shader brush for this along with my 110 brush from rebel 66 to blend this shade across and outwards. Instead of using tape on the outside corners of the eyes in this look I used the line of Laura’s natural brow-line to create an almond shape,most flattering to her eyes.
  3. I blended this colour out using my Sigma E40 Brush and then continued to apply the shade all over the lid using my flat shader brush. Again I blended this into the eyes.
  4. For extra depth I repeated these steps once more. This colour is hellllla pigmented so please don’t go all dip happy with this colour. Conjunctivitis isn’t very good looking!
  5. Next I took a yellow pigmented sparkle eye-shadow… I repeat YELLOW. If you use any darker shade with this burnt orange you will loose all effect. It needs to contrast not blend ladies and gents.
  6. Apply this to the inner corners of the eyes and lower lash line. 
  7. Next take an under eye brush-any will do. Apply the burnt orange shade to the lower lash line and blend outwards and inwards towards the inner corner of the eye. Make sure to bring this colour straight across to give the illusion of a longer eye. Its so flattering.
  8. Apply liquid or gel liner to the top lash line. Create a small cat flick following the almond shape of the eye and working toward the brow bone.
  9. Apply gel liner to the inner waterline. If you want extra dark eyes apply a kohl pencil to the tight-line of the eye.
  10. Apply lashings of mascara.
  11. I then applied Ardell lashes – ‘Demi Wispies’ . These are my absolute favourite fake eyelashes for special occasions or going out.

photo (1)

  1. I then started my normal foundation routine, however this look required extra contouring. 
  2. I used a new foundation on this look -Clinique superbalance foundation. Which ill have a review up on as soon as!
  3. Read my post on contouring and highlighting for more info. 🙂
  4. http://blushinbrownies.com/2014/11/11/contouring-like-a-pro/
  5. I finally applied red lip liner and lipstick for gorgeous red lips. Using Seveenteen lipstick and lip liner. Beautiful deep red colour. I highly recommend these products.

1525416_1727726084119883_4821216822040829874_n

This is such a glamorous look,perfect for Christmas and winter as well as any other special event! Thanks for reading and don’t forget to get in touch.

Nicholle-Marie

0

Cranberry & Smokey Brown Eye Makeup Look .

Hey Guys!

Over the week I went up to Dublin and bought some new makeup goodies, I had to get into Inglot and was in makeup HEAVEN! Inglot honestly has the most amazing pigments EVER.

So anyway this look is based all around my new BEAUTIFUL shades. Hey thuuuur!

photo 3 (3)

For this look I used shades 341, 450 and 329. 

20141127_144537    (shade 341)

20141127_144210   (shade 450)

20141127_144435    (shade 329)

Swatches of these beautiful shades ! 

20141127_144626

I started of this look with shade no.341. I packed this shade onto my lid, starting at my lash line and heading up into my eyebrow. This is a perfect matte base colour and goes so so well with the cranberry colour (shade 450 as its rich in pinky pigments)! I packed this shade on using my sponge tip brush from my Rebel 66 makeup brushes. 

Next I took my Sigma flat shader brush and drew a cut crease with the cranberry-450 shade. I then blended this upwards and out using my Sigma E40 fluffy brush. Making sure to BLEND BLEND BLEND.

I then took my Rebel 66 110 brush and applied the dark smokey brown shade-329 into my crease (my inner inner crease not my new crease created by my 450 shade!) and slightly above it, this created a lovely dark look with tons of depth and highlighted the lovely cranberry shade perfectly as a transition shade. I repeated this step three times as I wanted a lot of depth and warmth to the eye.

I then took my Sigma flat shader brush again and re-applied the cranberry shade to the top of the dark smokey-329 shade. Just enough to blend out from the eye, so as the cranberry wouldn’t loose its intensity.

Next I took my pencil shader brush from Sigma and I applied some of the 329 colour and the 450 shade to my lower lash line, blending these shades out and in towards the inner corner of the eye.

I then applied gel eye-liner,using ‘Fuschi’a-gel liner in ‘chocolate’ to my upper lash line  and finished with some mascara.’ (I find chocolate to be the most flattering shade on all eye colours as its not too much and it blends with any eye shadow beautifully! You also don’t come away looking like a complete Vampire ha).

Finally I took my highlight shade ‘Dust’ from my Naked 3 palette and applied it to the brow bone. This is a gorgeous highlighting shade, so flattering and draws attention directly to the eyes.

And voilà a lovely warm wintry eye look filled with colour, vibrancy and most importantly DEPTH.

Thank you Inglot for coming into my life with these AMAZING shades haha.

photo 1 (4)     

 photo 2 (3)   

  photo 4 (1)

Thanks for reading, don’t forget to comment and share your experiences!

Nicholle-Marie.

0

Step-By-Step Bronze Smoky Eye

Hey hey hey .
This post is on a Bronze Smoky Cat eye I done recently. I decided to take step by step pictures to show you all how I did this look 🙂

First off I started with an eye primer . For this I used urban decays ‘Eden’ . I applied it all over the lid top and bottom . It’s a lovely primer (very thick) and compliments matte shades very we’ll . I used tape under my eyes to get a perfect cat eye shape. Making sure to get each side the same shape .

Next I took my Fuschia gel eyeliner in ‘chocolate’ . I applied a thin line of this liner above where my natural crease would be . Then I took my sigma eye pencil brush and blended it upwards and outwards towards the tape (this is great because you can make as much mess as you want and when you remove the tape you will have perfect clean cut eye shadow .

IMG_1356.JPG

The next step was a transition colour fading outwards and upwards from the chocolate colour . For this I used Maybelline 24hr stay gel eyeshadow in bronze. I used the same sigma pencil brush and blended the colour upwards making sure not to loose the transition of the colour (big fat smudgy eyes ain’t too good 😛 )

IMG_1357.JPG

Next I took my Fuschia palette and took a dark brown matte shade and applied it to the outer corners of my eyes , using the tape as a guideline makes this step so easy . I then blended this colour into the chocolate liner .

IMG_1359.JPG

IMG_1361.JPG

Next I took a sun kissed bronze shade for the middle part of my eyes and blended it into the dark shade in my outer corners . This look is all about spending the time to blend so window wipe that baby ouuuuut . 🙂

IMG_1363.JPG

I then applied the same Fuschia eyeliner in ‘chocolate’ to my eyes following the tape I applied to the outer corners of my eyes to get a crisp line . If you feel like applying liner to your waterline do this step now , however I love my eyes to be as big so I skipped this step .

IMG_1364.JPG

Finally go ahead and finish this look with eyelashes and your base routine . I used Ardell lashes here ‘beauties’ because I wanted very natural lashes .
This picture is after a night out of dancing and singing so be aware my camera wasn’t in the best of light.


IMG_1376.JPG

Hope you enjoyed , don’t forget to follow for more updates !