0

Urban Decay – Naked 3 Palette Makeup Look

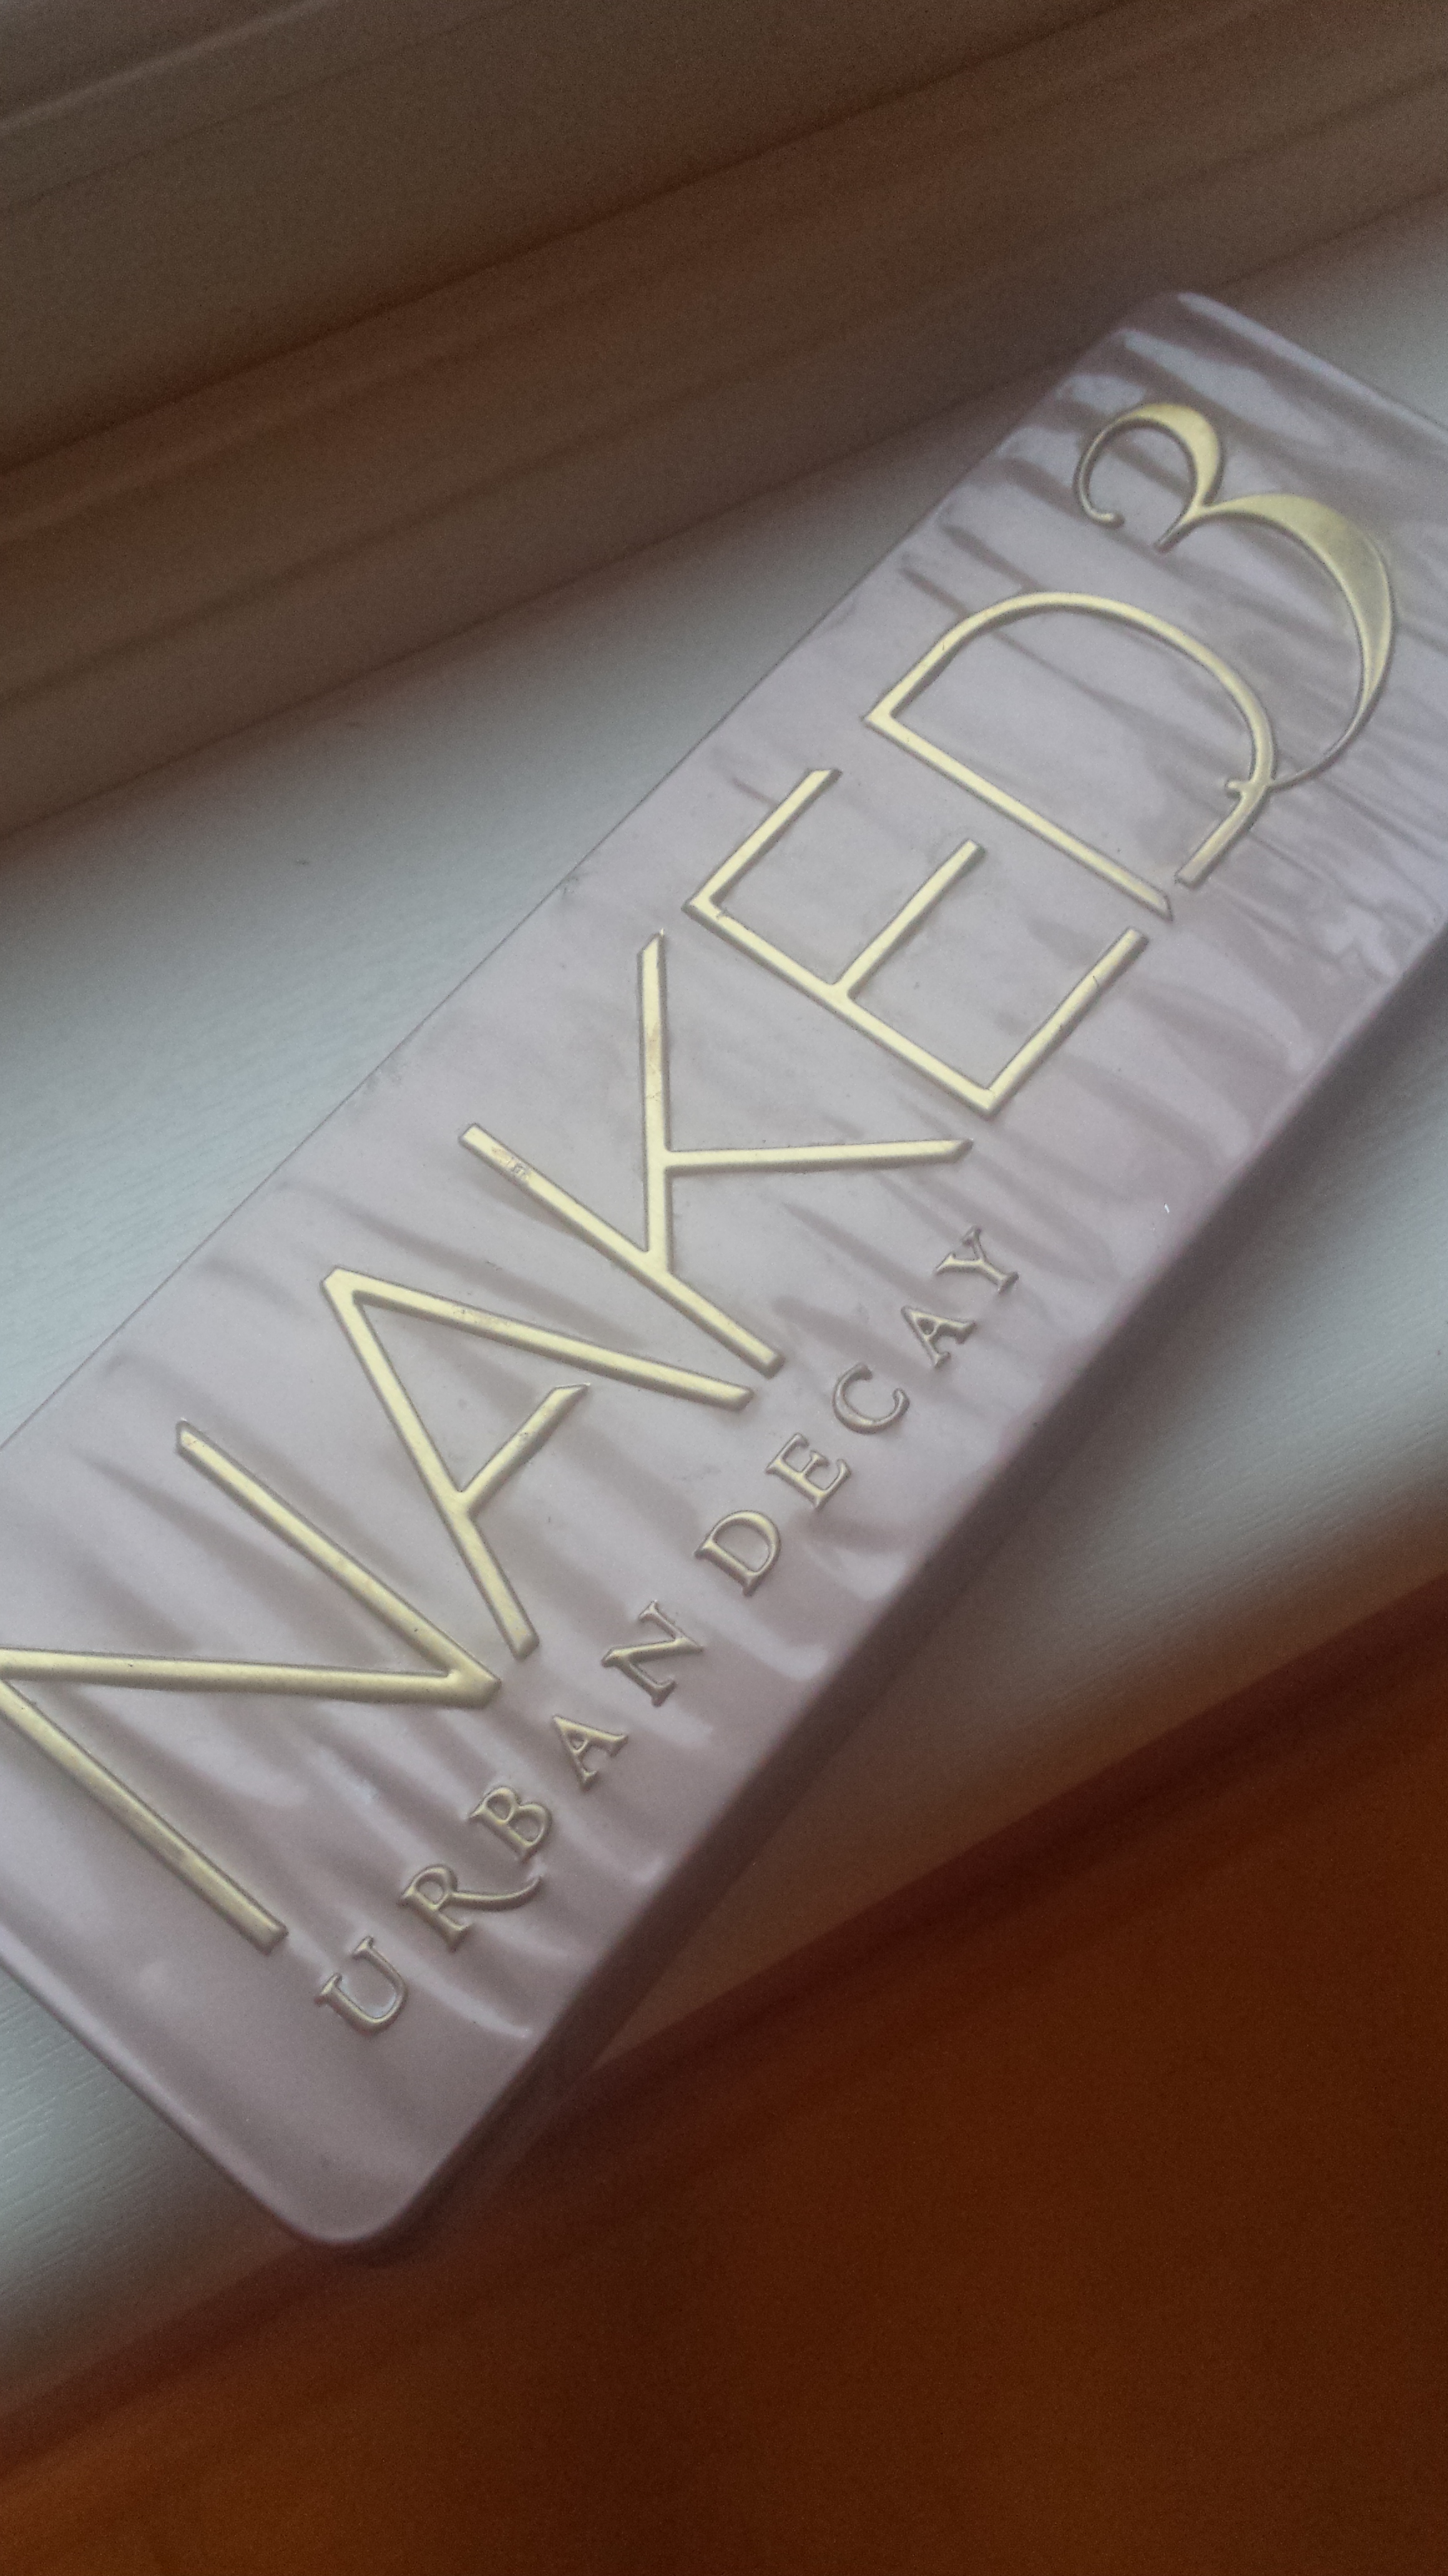
I decided when my original Naked palette ran out id go ahead and buy a new one. However with so many different palettes out there, The original Naked palette, Naked palette 2 , Naked palette 3 and then the Naked basics palette, its hard to choose  ONLY one. I took a leap of faith however and went with the Naked 3 as its the newest out there.

20141111_154408

This palette appealed to me anyway as I Love love laaavee pinky tones. (Noway I can hear you all sigh haha) .

20141111_154339

Base –

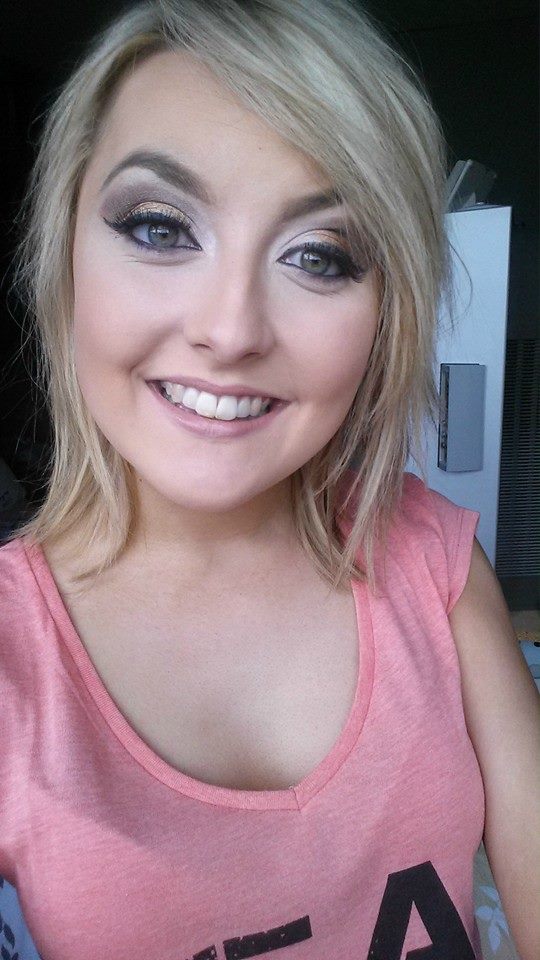
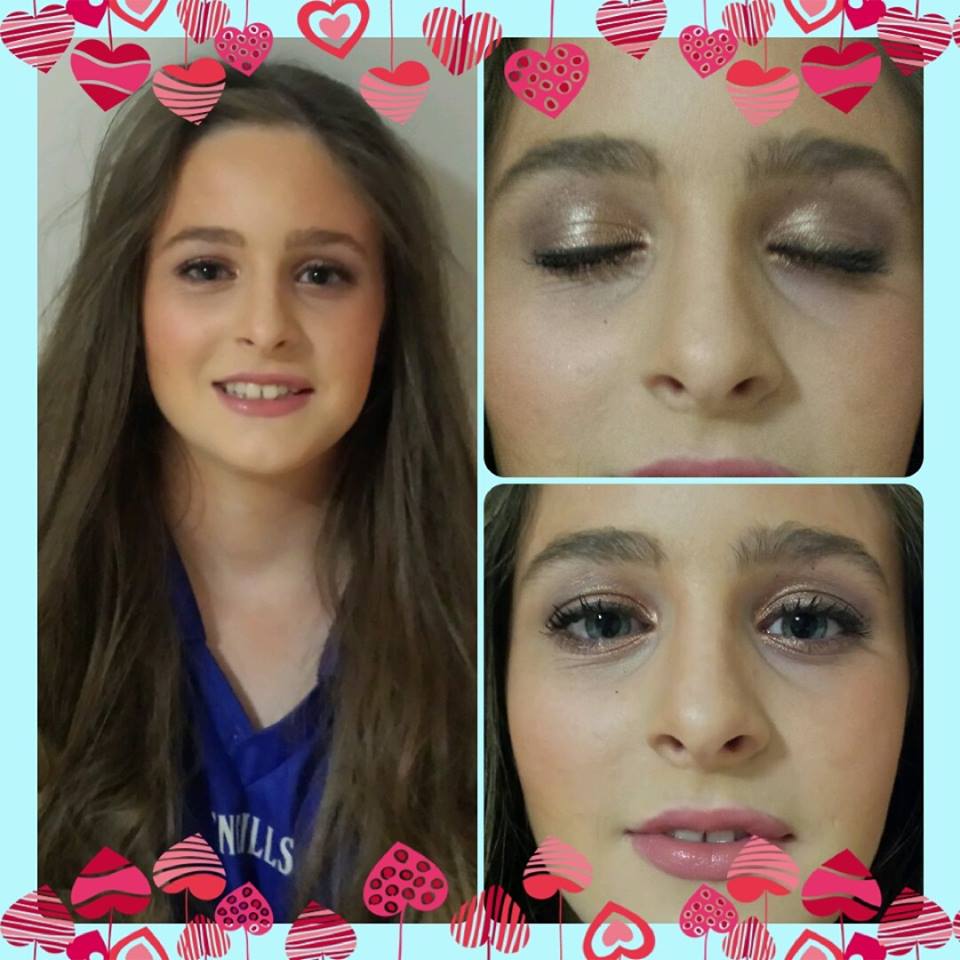
For my base I used all the steps I usually do matching the correct foundation to my models skintone and obviously basing the highlighting colour and contour around her skintone. The contour I used on this model was particulary heavy as that was the desired effect. (See my post on contouring and highlighting here for more info… ) —> http://blushinbrownies.com/2014/11/11/contouring-like-a-pro/

10485237_665882710168695_4128324753250209996_n

Eyes –

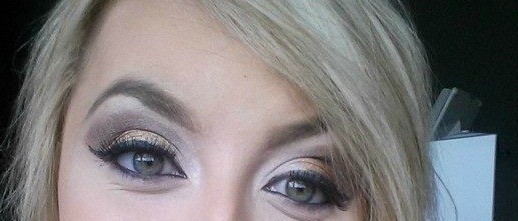
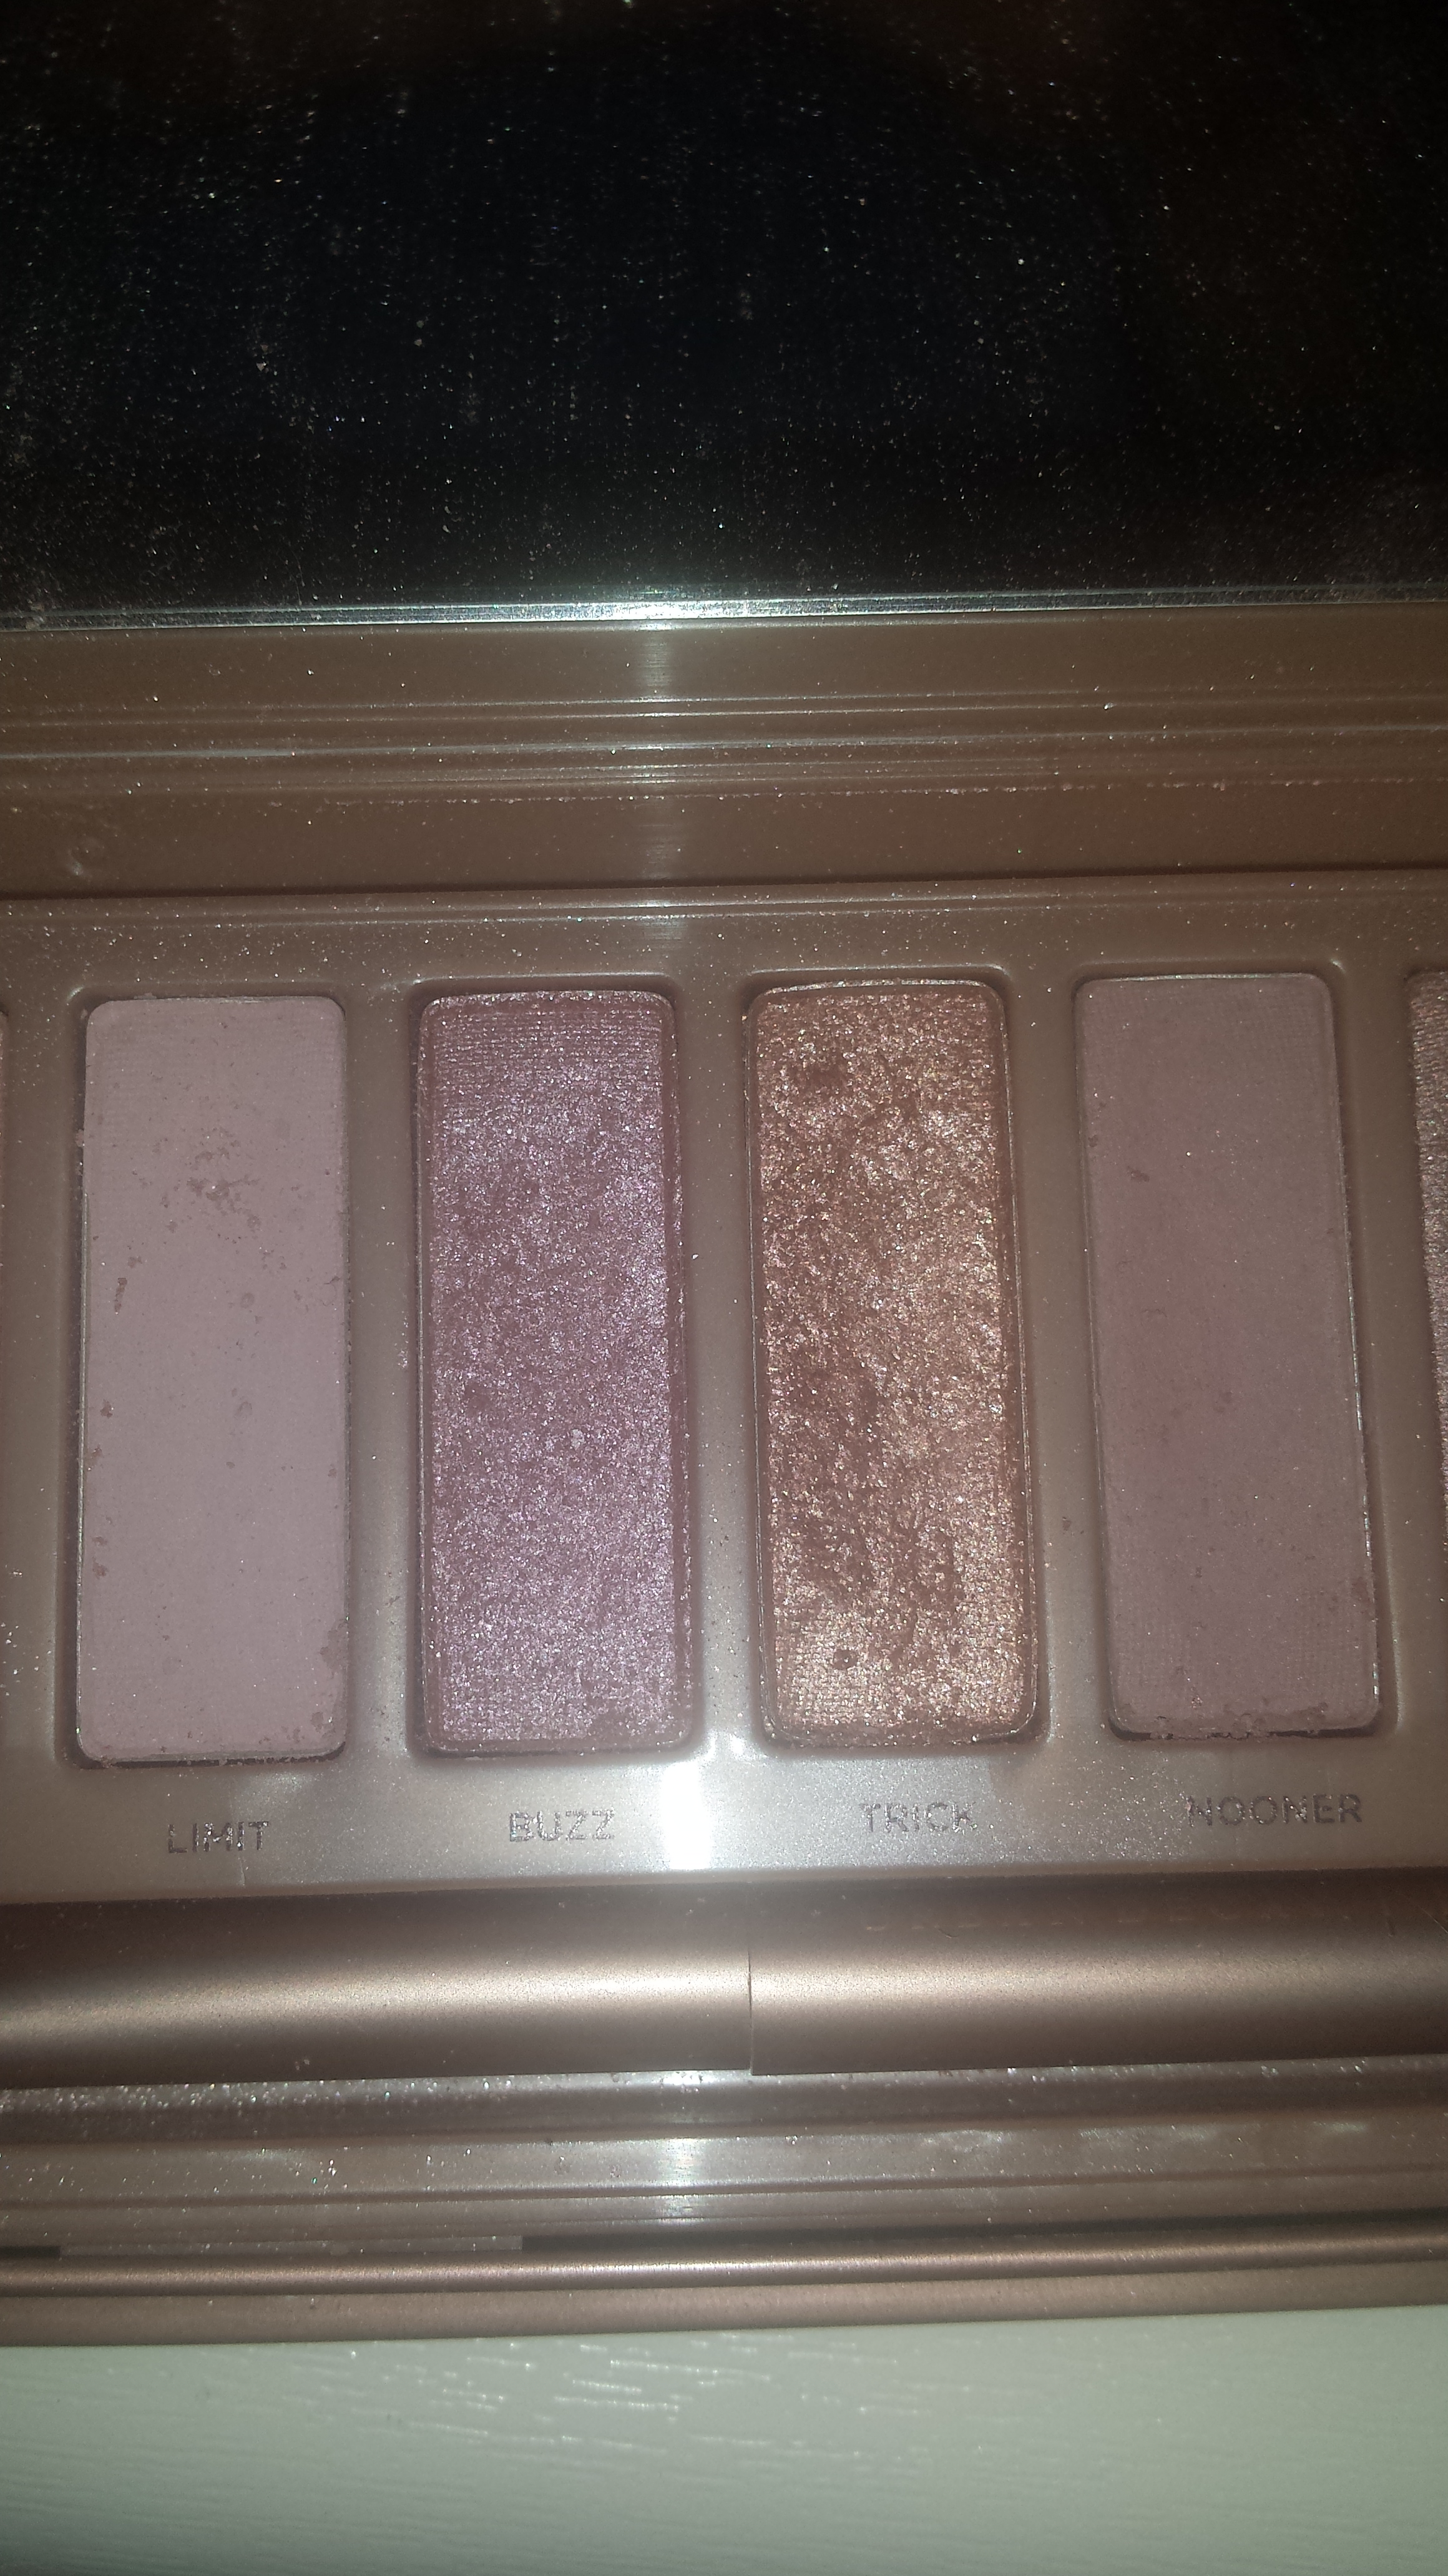
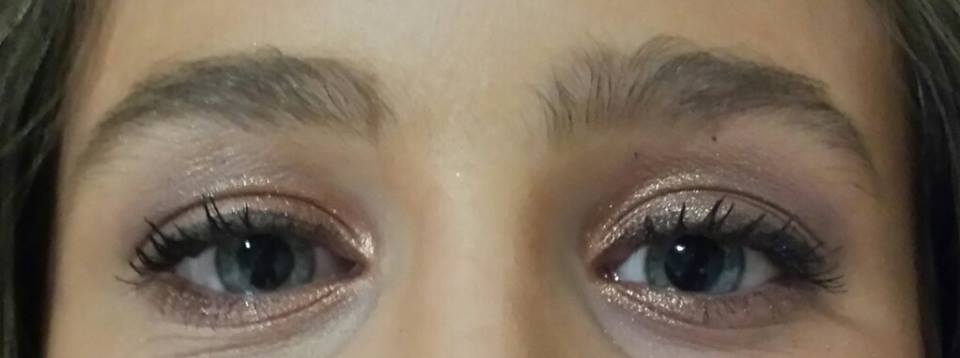
For this look I used four colours from this palette. ‘Buzz, Nooner, Trick and Limit’

  1. First I applied Urban Decay’s ‘Eye Primer Potion’ all over the lid. Or as I call it,  my Magic wand!
  2. I then used my Sigma Beauty Precision Angeled P84 brush and packed on the shade ‘Buzz’ on the outer crease.
  3. Next I took ‘Nooner’ and applied it using the same brush just above where the crease is to create the illusion of a bigger eye. This is 10000000 gillion , million my favourite colour in this palette.
  4. I then blended that shade out with my Sigma E40 blending brush.
  5. Next I took the shade ‘Trick’ with my P86 tappered blending brush and packed that warm glittery gold shade on to the centre and inner corners of the lid.
  6. I took my E40 brush back out and blended these colours together moving forwards and back to create a smooth transition.
  7. As a transition colour I took ‘Limit’ and applied it above were ‘Nooner’ stopped blending it up to the brow bone. (Limit has a lovely glimmer to it which also acts as a highlight which is perfect for the brow bone, brows on point)
  8. Again this colour was blended out and upward towards the brow bone , creating a lovely transition.
  9. For the eyeliner I used a very light brown shade from Fuschia ‘Mythiology’ as a black eyeliner would be too much of a contrast with these shades.
  10. Lashings of mascara using Benifit’s ‘Theyre real Mascara’

Brows –

  1. Using ‘Benifits Brow Zings’ in the lightest shade.

10511350_665883133501986_858198508757267437_n

The finished look of the base and eyes came together and looked gorgeous on my model and overall Im very happy with the results of the Naked 3 palette!

10154012_611499005607066_214749565_n

Dont forget to follow Blush’inBrownies if youd like to see more and id love to hear from you. 🙂

2

Contouring Like a Pro..!

Contouring and highlighting has got so big over the last few years and its no longer a secret for us Makeup artists. Now every Tom, Dick and Harry is doing it and I’m pretty certain your nana is too!

To begin with make sure your face is completely hydrated and B E A UTIFUL looking as youll be using a hell of a lot of creams or powders. Or Both if your like me. Cheekbone obsessed!

Apply a primer that suits your skin, depending on your skin type and needs. I use a number of primers depending on how my skins feeling that day. On this look I used Benifit ‘Porefessional’. Next apply your foundation. I usually always go for full coverage when contouring as it gives better results. And hey who doesn’t like to look like a fresh faced porcelain doll..hahaha.

For this I have used Estee Lauders double wear foundation. I then go in with my  contouring kit, this one I am using is from Sleek Makeup. I applied the second darkest shade in the palette to my temples, my cheekbones, my forehead, my nose and under my jawbone. Scuury Scurrray…

I then took my highlighting colour, I am using ‘MAC pro longwear concealer’ in NW15 and applied it to the base of my nose, my forehead, under my eyes (to include the inner C) and to my chin.

I blended these shades out in two goes. First blending my contour out into my foundation and then blending out my highlight. ( What a scary looking girl haha )

photo 1

For extra depth and effect I always go in to my cream contour with powder contour. My personal favourite is Hoola bronzer by Benifit however any completly Matte shade bronzer will do. I blend all that contour in using my Sigma contour brush and then add blush. Making sure to blend the blush into the contour correctly.

photo 2

All thats left to do when you have all that done is to do the rest of your makeup as desired and thats you good to go . Below I have done my eye makeup the way I wanted to using my Fuschia colours and adding a flick.

photo 3

Id love to hear your thoughts on this post and what your everyday makeup routine is.

Dont forget to follow Blush’inBrownies and get in touch ! 🙂

0

Gold Smoky Cut Crease !

Today I wanted to share a makeup look I did a while back. Its my favourite going out makeup at the minute and its very easy to re-create. In this look I used MAC, Makeup forever, Barry M and Fuschia products.

Lets gooooo…

BASE –

  1. I started with my base using L’oreal Lumi Magique pure light primer all over my face
  2. Foundation : Using a combination of Mac studio fix fluid foundation and Make –up forever’s HD foundation in the colours NW15 and soft beige. Apply all over face taking care to blend blend blend outwards and upwards into your fake tan on your neck area if you’re wearing any. If you’re not make sure to blend perfectly to avoid any lines and colour mis-haps. Oompa Loompa face and all that.
  3. Using MAC Pro-Longwear concealer in NW15 apply as a highlighter in the shape of a triangle under the eyes towards the lips, on the base of the nose, towards the forehead and on the chin. I use my finger generally for this part as I like my face to be extra bright in these areas and I sometimes think a blending brush can lose this effect. Make sure to add this concealer to the inner ‘C’ of the eye to minimize bags under the eyes. A BIG problem for me personally.
  4. Taking a contouring kit. I use CROWN brushes contouring kit. Take the darkest shade or shade most attractive to you and add said shade to your temples, directly under the outline of your cheekbones and forehead (making sure to keep the highlight just above your nose).
  5. Blend blend blend in to your current foundation using a large Kaboki brush. You don’t need to do this next step but I always do because I like my makeup to be as airbrushed as possible..hello Barbie. Haha
  6. Apply the contour colour again, (in a lighter shade this time than the colour used for your cheekbones/forehead/temples ) to the outer part of your nose , the nostril area and to the lower parts of your jaw (taking care not to hit your neck). Again blend blend blend using a skunk brush.
  7. Next I took Makeup forever HD setting powder. This is an amazing setting powder as it contains light reflecting pigments in order to show the colour of your foundation in photographs even when in flash photography. LOVE IT.
  8. I applied this under my eyes, under my cheekbone contour and to my chin. Leaving the other areas of my face as I wanted a dewy glow.
  9. I then took my SIGMA contour brush and applied HOOLA bronzer over my already contoured areas to deepen it and add more depth. (Ill never look like Kim Kardashian but a girl has to try )
  10. Blush was added to the apples of my cheeks and blended back to my contour in the shade ‘Just glow’ by Fuschia. This is a gorgeous mineral pigmented blush which also is ahhhhhmaze at picking up light reflecting colours.

Eyes –

  1. For the eyes I applied Urban decay’s ‘original’ eye primer to my eyes.
  2. I then took ‘Gold dust’ a pure pigmented glitter eyeshadow by Barry M and applied it all over the centre of my lid. Its gorgeous on any eye-colour .
  3. Next I started my cut crease. Applying Fuschia’s gel liner in the shade ‘chocolate’ above were my natural crease would be. I created a half-moon shape, then taking my SIGMA E47 shader brush I blended that colour upwards. You can use any dark coloured eyeshadow mixed with water for this or gel liner .
  4. As a transition colour I went in with MAC ‘Era’ and blended that colour on top of the gel liner fading into MAC ‘Arena’. This is a tedious process and needs a lot of blending to get the correct cut crease look so I used my Sigma tapered blending brush in E40 to achieve this quicker. You may need to start off with a smaller blending brush first however until you get used to the blending as its worth the long process to get that perfect cut.
  5. For my inner crease I applied MAC ‘Espresso’ blending that back and forth. Adding more and blending again until I was satisfied with the depth.
  6. Next I created a cat eye flick using ‘Wet N’ Wild’ glitter liner in ‘Black’. It’s a black liner with a tint of glitter in it.
  7. I applied lashes using Eyelure ‘Volume 100’ lashes.
  8. I then filled in my lower and upper waterline using MAC ‘Feline’ eyeliner.

1486823_62113001131063nnn2_6796480563956969180_n

Brows –

  1. Using Benifits ‘Brow Zings’ in the shade ‘Light’ trace out outline using the gel and an eyebrow brush. I use Sigma E68.
  2. Colour in patches of eyebrow that have sparse hair using the powder.

Lips –

  1. I applied Makeup Forever Aqua Waterproof Lip Liner in ‘15 C Pink’ .
  2. Finally I applied Makeup Forever ‘Lab shine Chrome shine Lipgloss’ in ‘M16 Frozen Pink’.

And that girls and boys was my simple gold glitter cut crease makeup look.!

1486823_621130011310632_6796480563956969180_n

If you have any questions or comments and liked this post or want to see more makeup tutorials please leave a comment below.

1

No7 Cleanse & Care Eye Make-up Remover

I recently bought No7 cleanse and care eye make-up remover as my normal simple eye makeup remover had ran out and I thought I might switch things up a bit.

My first impression was that the packaging is very flattering. The use of a translucent bottle to see the blue product inside is a great idea. It makes it more attractive and vibrant. The writing on the outside of the bottle is also great. A very simple idea with a great look about it.

The first time I used this product I made sure to wear lashings of mascara, along with heavy eye shadow and eyeliner. When I took of the lid and tried to squirt out the product onto my hand I realised that a cotton pad was one hundred percent necessary with this product. HOWEVER the pump itself on the product is awful, half the product I pumped out would go over the bathroom sink instead of in my hand. Not a good time NO7, not a good time.

20141105_162626

It’s a more oil based product compared to my usual creamy based makeup removers but that didn’t worry me too much and it shouldn’t worry you either unless you have a specific skin type that should not be using oil based makeup remover s like an oily skin type. This makeup remover is fine for sensitive skin and eyes as I have very sensitive skin and found no irritation at all. Although as you all know everybody is different and don’t take my word as the gospel either ….well too much har har har.

Take 2 was followed by a cotton pad and I was pleasantly surprised. This makeup remover certainly cut down on my heavy duty eye makeup fairly quickly and my drag queen eyes phase didn’t last too long while removing my mascara.

I bought this product in boots for €11.00, yes I know it’s on the pricy side but I realised when using it that you only need a small amount of product on the cotton disk so it’s very affordable when you think that this product may last up to two months.

It was quite a change for me as I’m used to using more of a cream based eye makeup remover  however I didn’t find the change as scary as I thought I would…. goblins and ghosts hiding at the bottom of the bottle and all that. Overall my

Review of this product was good. The product itself is brilliant cutting down on makeup and doing its job correctly. However the design of the bottle could use a little oomph to make it easier to use and more people friendly.