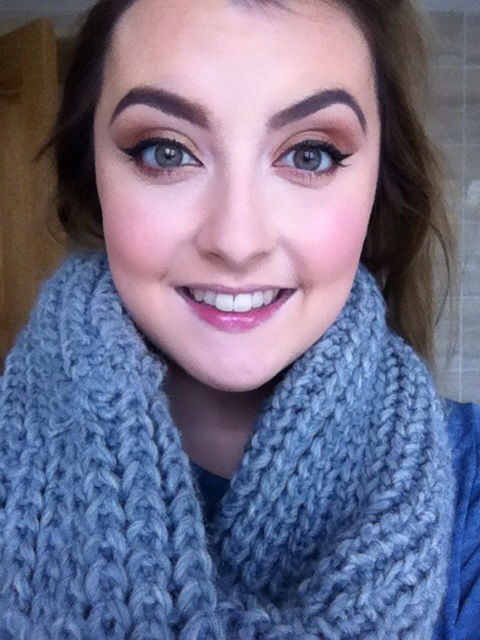
0

Emphasise Green Eyes ❤️

Hey guys!

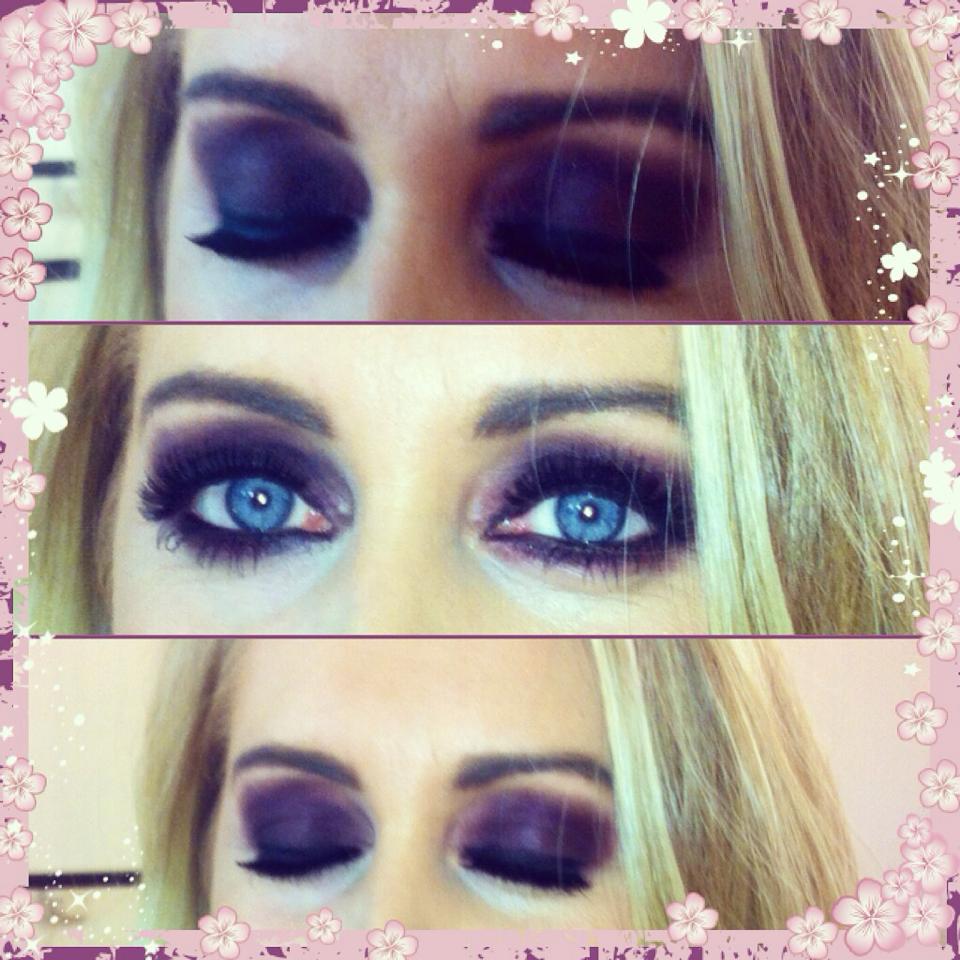
So today I decided to emphasise my green eyes and make them a darker more emerald like green shade .

For this look I just went ahead with my everyday foundation routine and then moved on to the exciting part!

IMG_0477

Products:

  1. Naked 3 palette – shades nooner, blackout and limit.
  2. Fuschia palette- a neutral base colour (any will do).
  3. Mascara (again any)
  4. Eyeliner – gel (Fuschia gel pot), shade – chocolate brown.
  5. Eyeliner – (tight line & water line) Mac kohl – feline
  6. Fake eyelahes – (optional)

Application:

  1. So I started of applying the base shade to my eyes with a fluffy blending brush. I took this shade all the way up to the eyebrow.
  2. Next I applied limit -naked 3 palette all over the eye, except the very inner corner as I wanted to keep that area light and bright.
  3. I then took my angled application brush along with nooner – naked 3 palette. I applied this just above my crease.
  4. I then blended this out with a fluffy dome shaped brush.
  5. I then took blackout – naked 3 palette on another application brush. This I applied in the very inner crease.
  6. I blended that out with the same dome shaped brush.
  7. I then applied gel eyeliner to the upper lash line. I applied pencil liner to the tight line and water line.
  8. I completed this look with mascara. I used NYC jumbo lashes mascara .
  9. For a night out or extra glam you could add fake eyelashes, I left it without any as it was a daytime look. 

Hope you enjoyed this look and I’d love to hear from you 🙂 


0

Intense Smokey Eyes ♥

Good Morning Ladies and Gents,

This post is on gorgeous smoked-out eyes. This look is extremely intense and over-the-top much like would be seen in ‘TOWIE’ or ‘Geordie Shore’. I know many girls out there,including myself are obsessed with this type of make-up at the moment and its seen everywhere on social media!

So for this look I began with the eyes first, I applied foundation to the eyes and underneath the eye area, I then applied powder so that when I applied the eye-shadow it wont move or slide.

I then went in with a nude base eye-shadow. For this I used my fuschia palette, taking a matte cream colour. You can use absolutely and cheap shade for this step.

Next I applied a deep-purple shade to the eye,all-over the lid continuing to add more and more depth of colour until it was prominent and made the eyes pop. I then took my undereye brush and applied this same shade under the lash line.I took this colour lower than I usually would for the illusion of bigger eyes and to draw attention to the eye colour.

I blended this shade out -in the shape of the models eye.

Next I took a matte black shade and repeated the previous steps.For this shade I made sure to leave a halo of the purple shade above the black colour. I continued to apply the black shade adding depth of colour and blending the shade into the lash line. I then took my under eye pencil brush with some of the matte black shade and applied it to my lower lash line, this time the black matte shade was closest to my lashes and I also left a Halo of the purple shade to the bottom lash-line. Again this draws attention to the eye colour.

I applied gel eye-liner to the upper lash line and lower lash line.Using my under-eye pencil while this gel was still wet,I blended the gel out to seal the eyes. I then applied this gel eye-liner to the waterline in one quick swoop to prevent discomfort for the model.

Finally I added lashings of mascara to the bottom and top lashes and then I finished the look by applying Ardell Fake Eyelashes.

10641000_1729343727291452_882754831442824507_n

Above is the finished look 🙂 Hope you enjoyed, don’t forget to like,comment and follow. 

Nicholle-Marie x

0

Burnt Orange Eyes ♥

Hello hello helloo,

Today’s post is on an extremely flattering Winter trend eye-shadow shade -Burnt Orange. For this look I combined a nude base colour (matte) my Inglot shade 383, and a glittery pigmented eye-shadow with hints of yellow gold through it.

  1. I began by taking a matte-nude eye-shadow base from my Fuschia palette. Any shade that is a nude-cream or pale pink/lilac-cream will do. I applied this from my lash line into my brow bone with my sponge-tip eye-shadow brush.
  2. I then began to create a cut crease using my Inglot shade 383(Burnt Orange). I used my flat shader brush for this along with my 110 brush from rebel 66 to blend this shade across and outwards. Instead of using tape on the outside corners of the eyes in this look I used the line of Laura’s natural brow-line to create an almond shape,most flattering to her eyes.
  3. I blended this colour out using my Sigma E40 Brush and then continued to apply the shade all over the lid using my flat shader brush. Again I blended this into the eyes.
  4. For extra depth I repeated these steps once more. This colour is hellllla pigmented so please don’t go all dip happy with this colour. Conjunctivitis isn’t very good looking!
  5. Next I took a yellow pigmented sparkle eye-shadow… I repeat YELLOW. If you use any darker shade with this burnt orange you will loose all effect. It needs to contrast not blend ladies and gents.
  6. Apply this to the inner corners of the eyes and lower lash line. 
  7. Next take an under eye brush-any will do. Apply the burnt orange shade to the lower lash line and blend outwards and inwards towards the inner corner of the eye. Make sure to bring this colour straight across to give the illusion of a longer eye. Its so flattering.
  8. Apply liquid or gel liner to the top lash line. Create a small cat flick following the almond shape of the eye and working toward the brow bone.
  9. Apply gel liner to the inner waterline. If you want extra dark eyes apply a kohl pencil to the tight-line of the eye.
  10. Apply lashings of mascara.
  11. I then applied Ardell lashes – ‘Demi Wispies’ . These are my absolute favourite fake eyelashes for special occasions or going out.

photo (1)

  1. I then started my normal foundation routine, however this look required extra contouring. 
  2. I used a new foundation on this look -Clinique superbalance foundation. Which ill have a review up on as soon as!
  3. Read my post on contouring and highlighting for more info. 🙂
  4. http://blushinbrownies.com/2014/11/11/contouring-like-a-pro/
  5. I finally applied red lip liner and lipstick for gorgeous red lips. Using Seveenteen lipstick and lip liner. Beautiful deep red colour. I highly recommend these products.

1525416_1727726084119883_4821216822040829874_n

This is such a glamorous look,perfect for Christmas and winter as well as any other special event! Thanks for reading and don’t forget to get in touch.

Nicholle-Marie

0

Big Bold Sparkly Eyes !

In this post I’ll be talking all about how I emphasise my BIG green eyes. I use this look on a regular basis as it’s my favourite eye makeup and it’s SPARKLY !

For this look I apply my base as I would normally every day an then I start the fun part. Zee eyebawlss.

1. Apply an eye primer all over the lid. For this I used urban decays ‘sin’ as it’s got sparkly pigments throughout and complements shimmery shades beautifully. This primer is my favourite of all time and I’d highly recommend it . But that’s for another day !

2. Now take a matte brown espresso type shade and go in to your crease with it. This will add some definition to your eyes as your going to be using such a light shade all over the lid. Any dark brown will do however I used my MAC dark brown shade in ‘espresso’ . LAVE it :)!

3.now the fun starts. I took my Barry M gold shimmer dust pigments and applied it to the lid using any flat eyeshadow brush . I then blended this all in to the dark shade I use earlier using my sigma e40 blending brush. This is an important step as you don’t want the shadow to look clumpy or make it look like it’s just sitting there screaming hi . Haha
Continue to repeat these two steps, applying the gold pigments and blending to build up the colour to your desired effect.

3. Next go in with eyeliner. In this look I’m using ‘MAC-Feline’ kohl pencil.

4.Finally apply lashings of mascara and /or fake eyelashes. I only applied mascara here as this is my everyday makeup.

IMG_1348.JPG

IMG_1349.JPG

IMG_1344.JPG

Thanks for reading, don’t forget to follow for more updates!