
Hello hello helloo,
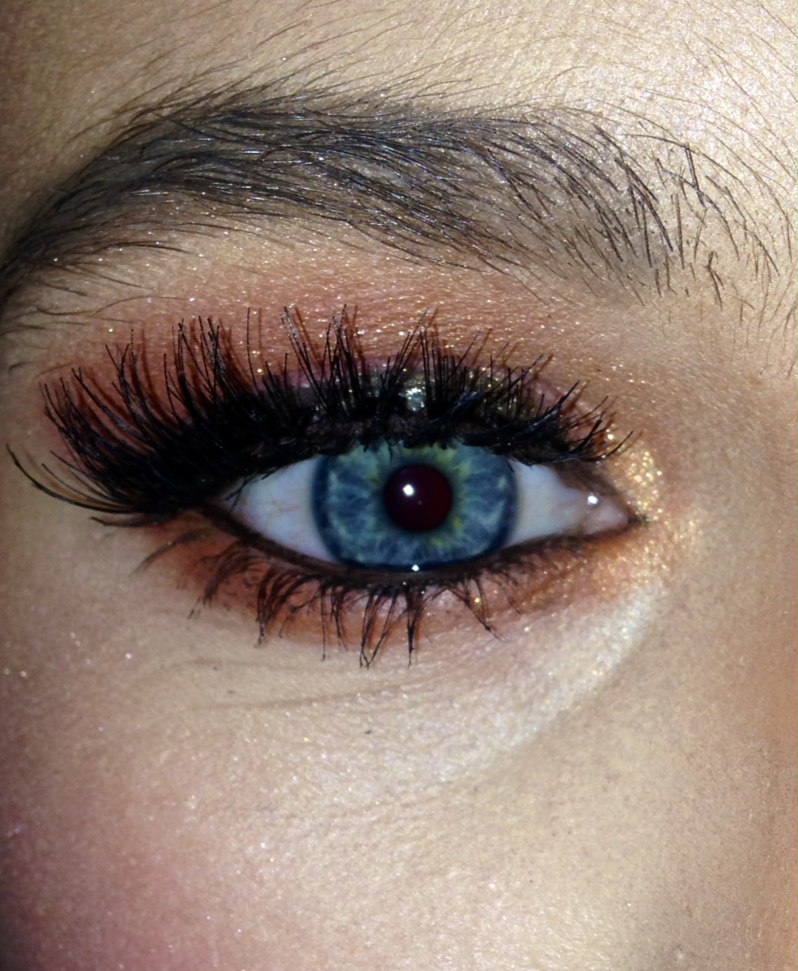
Today’s post is on an extremely flattering Winter trend eye-shadow shade -Burnt Orange. For this look I combined a nude base colour (matte) my Inglot shade 383, and a glittery pigmented eye-shadow with hints of yellow gold through it.
- I began by taking a matte-nude eye-shadow base from my Fuschia palette. Any shade that is a nude-cream or pale pink/lilac-cream will do. I applied this from my lash line into my brow bone with my sponge-tip eye-shadow brush.
- I then began to create a cut crease using my Inglot shade 383(Burnt Orange). I used my flat shader brush for this along with my 110 brush from rebel 66 to blend this shade across and outwards. Instead of using tape on the outside corners of the eyes in this look I used the line of Laura’s natural brow-line to create an almond shape,most flattering to her eyes.
- I blended this colour out using my Sigma E40 Brush and then continued to apply the shade all over the lid using my flat shader brush. Again I blended this into the eyes.
- For extra depth I repeated these steps once more. This colour is hellllla pigmented so please don’t go all dip happy with this colour. Conjunctivitis isn’t very good looking!
- Next I took a yellow pigmented sparkle eye-shadow… I repeat YELLOW. If you use any darker shade with this burnt orange you will loose all effect. It needs to contrast not blend ladies and gents.
- Apply this to the inner corners of the eyes and lower lash line.
- Next take an under eye brush-any will do. Apply the burnt orange shade to the lower lash line and blend outwards and inwards towards the inner corner of the eye. Make sure to bring this colour straight across to give the illusion of a longer eye. Its so flattering.
- Apply liquid or gel liner to the top lash line. Create a small cat flick following the almond shape of the eye and working toward the brow bone.
- Apply gel liner to the inner waterline. If you want extra dark eyes apply a kohl pencil to the tight-line of the eye.
- Apply lashings of mascara.
- I then applied Ardell lashes – ‘Demi Wispies’ . These are my absolute favourite fake eyelashes for special occasions or going out.
- I then started my normal foundation routine, however this look required extra contouring.
- I used a new foundation on this look -Clinique superbalance foundation. Which ill have a review up on as soon as!
- Read my post on contouring and highlighting for more info. 🙂
- http://blushinbrownies.com/2014/11/11/contouring-like-a-pro/
- I finally applied red lip liner and lipstick for gorgeous red lips. Using Seveenteen lipstick and lip liner. Beautiful deep red colour. I highly recommend these products.
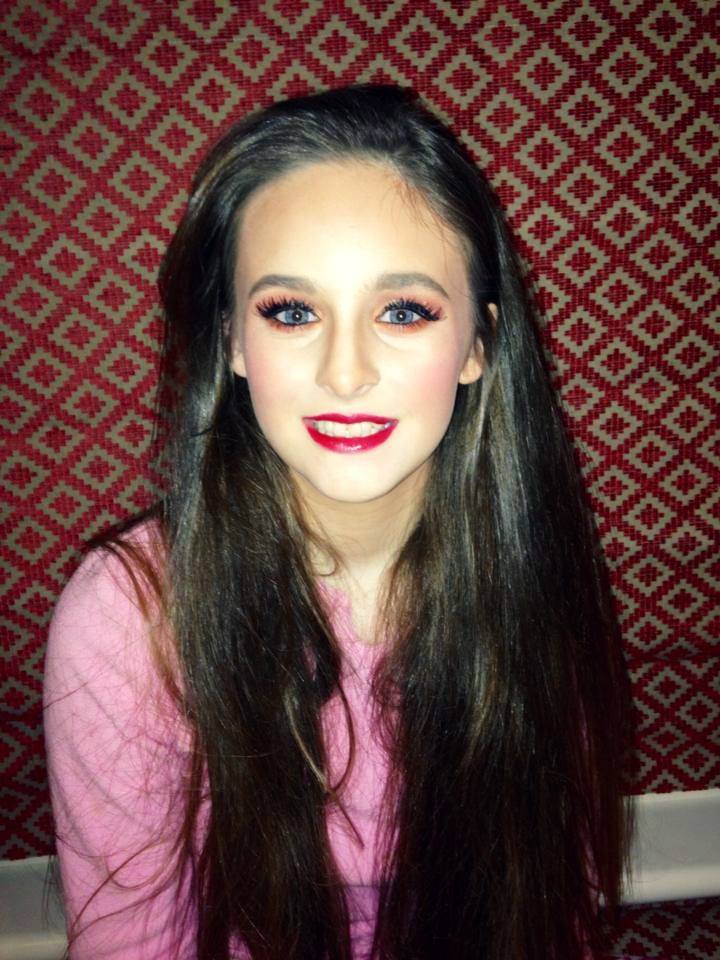
This is such a glamorous look,perfect for Christmas and winter as well as any other special event! Thanks for reading and don’t forget to get in touch.
Nicholle-Marie
