
Today I wanted to share a makeup look I did a while back. Its my favourite going out makeup at the minute and its very easy to re-create. In this look I used MAC, Makeup forever, Barry M and Fuschia products.
Lets gooooo…
BASE –
- I started with my base using L’oreal Lumi Magique pure light primer all over my face
- Foundation : Using a combination of Mac studio fix fluid foundation and Make –up forever’s HD foundation in the colours NW15 and soft beige. Apply all over face taking care to blend blend blend outwards and upwards into your fake tan on your neck area if you’re wearing any. If you’re not make sure to blend perfectly to avoid any lines and colour mis-haps. Oompa Loompa face and all that.
- Using MAC Pro-Longwear concealer in NW15 apply as a highlighter in the shape of a triangle under the eyes towards the lips, on the base of the nose, towards the forehead and on the chin. I use my finger generally for this part as I like my face to be extra bright in these areas and I sometimes think a blending brush can lose this effect. Make sure to add this concealer to the inner ‘C’ of the eye to minimize bags under the eyes. A BIG problem for me personally.
- Taking a contouring kit. I use CROWN brushes contouring kit. Take the darkest shade or shade most attractive to you and add said shade to your temples, directly under the outline of your cheekbones and forehead (making sure to keep the highlight just above your nose).
- Blend blend blend in to your current foundation using a large Kaboki brush. You don’t need to do this next step but I always do because I like my makeup to be as airbrushed as possible..hello Barbie. Haha
- Apply the contour colour again, (in a lighter shade this time than the colour used for your cheekbones/forehead/temples ) to the outer part of your nose , the nostril area and to the lower parts of your jaw (taking care not to hit your neck). Again blend blend blend using a skunk brush.
- Next I took Makeup forever HD setting powder. This is an amazing setting powder as it contains light reflecting pigments in order to show the colour of your foundation in photographs even when in flash photography. LOVE IT.
- I applied this under my eyes, under my cheekbone contour and to my chin. Leaving the other areas of my face as I wanted a dewy glow.
- I then took my SIGMA contour brush and applied HOOLA bronzer over my already contoured areas to deepen it and add more depth. (Ill never look like Kim Kardashian but a girl has to try )
- Blush was added to the apples of my cheeks and blended back to my contour in the shade ‘Just glow’ by Fuschia. This is a gorgeous mineral pigmented blush which also is ahhhhhmaze at picking up light reflecting colours.
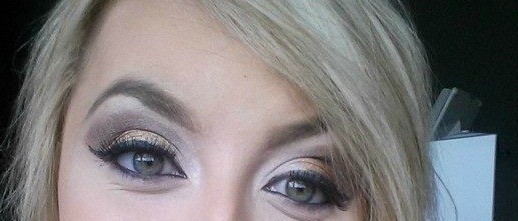
Eyes –
- For the eyes I applied Urban decay’s ‘original’ eye primer to my eyes.
- I then took ‘Gold dust’ a pure pigmented glitter eyeshadow by Barry M and applied it all over the centre of my lid. Its gorgeous on any eye-colour .
- Next I started my cut crease. Applying Fuschia’s gel liner in the shade ‘chocolate’ above were my natural crease would be. I created a half-moon shape, then taking my SIGMA E47 shader brush I blended that colour upwards. You can use any dark coloured eyeshadow mixed with water for this or gel liner .
- As a transition colour I went in with MAC ‘Era’ and blended that colour on top of the gel liner fading into MAC ‘Arena’. This is a tedious process and needs a lot of blending to get the correct cut crease look so I used my Sigma tapered blending brush in E40 to achieve this quicker. You may need to start off with a smaller blending brush first however until you get used to the blending as its worth the long process to get that perfect cut.
- For my inner crease I applied MAC ‘Espresso’ blending that back and forth. Adding more and blending again until I was satisfied with the depth.
- Next I created a cat eye flick using ‘Wet N’ Wild’ glitter liner in ‘Black’. It’s a black liner with a tint of glitter in it.
- I applied lashes using Eyelure ‘Volume 100’ lashes.
- I then filled in my lower and upper waterline using MAC ‘Feline’ eyeliner.
Brows –
- Using Benifits ‘Brow Zings’ in the shade ‘Light’ trace out outline using the gel and an eyebrow brush. I use Sigma E68.
- Colour in patches of eyebrow that have sparse hair using the powder.
Lips –
- I applied Makeup Forever Aqua Waterproof Lip Liner in ‘15 C Pink’ .
- Finally I applied Makeup Forever ‘Lab shine Chrome shine Lipgloss’ in ‘M16 Frozen Pink’.
And that girls and boys was my simple gold glitter cut crease makeup look.!

If you have any questions or comments and liked this post or want to see more makeup tutorials please leave a comment below.
